

AVAYA DOCUMENTATION CENTER
Find answers to your technical questions and learn how to use our products
Avaya Call Management System High Availability Connectivity, Upgrade, and Administration
Setting up the primary and secondary server roles
Decide which of the two CMS servers you want to designate as the primary server. On the primary server, run cmsadm and perform the HA configuration process. You also need the details of the server you plan to designate as the secondary server.
Before you begin
-
Ensure that you can log in to both CMS servers with root privileges.
-
Ensure that your /etc/hosts file contains the following entries in order:
IP_Address Fully_Qualified_Domain_Name Hostname. -
Download the CMS HA zip file from PLDS and copy it to the CMS server designated as the primary.
-
Install the WebLM license package. You require an Other Connector (OT Conn) license for the Admin-Sync connector, which pushes data from the primary server to the secondary server.
-
If your CMS servers are in different time zones, ensure that you know your NTP server IP address.
- Use PuTTY or a similar application to open command console windows for both CMS servers.
- On both CMS servers, do the following to log in as the root user:
- Run the
su - rootcommand. - When prompted, type the root password.
- Run the
- On the CMS server you plan to designate as the secondary server, run the
cat /etc/hostscommand to obtain server details from the hosts file.ADDITIONAL INFORMATION:During the HA configuration process, provide the IP address and FQDN for the secondary server. - On the CMS server you plan to designate as the primary server, run the
cmsadmcommand.STEP RESULT:The command output displays the following administration menu: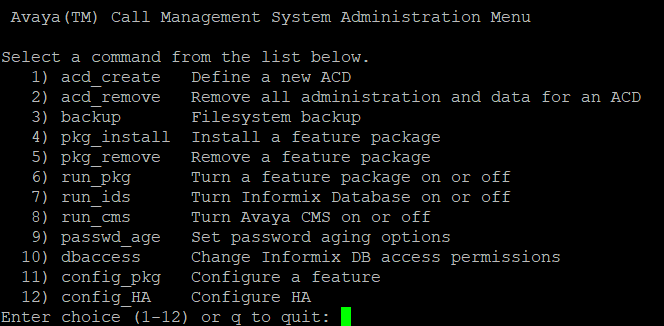
- To configure HA, type 12.
- When prompted, type 1 to set up the primary and secondary server roles.
- When prompted, type your NTP server IP address if the CMS servers are in different time zones.
- When prompted, type the IP address of the secondary CMS server.
- When prompted, type the FQDN of the secondary CMS server.
- When prompted, type the full path to the WebLM license package.
ADDITIONAL INFORMATION:For example: /export/home/cms/weblm_7.0.9.zip
- When prompted, type the full path to the CMS HA package.
ADDITIONAL INFORMATION:For example: /export/home/cms/HAcms_7.1.11.zip
- After pressing Enter, review the list of impacted services and system configuration files.
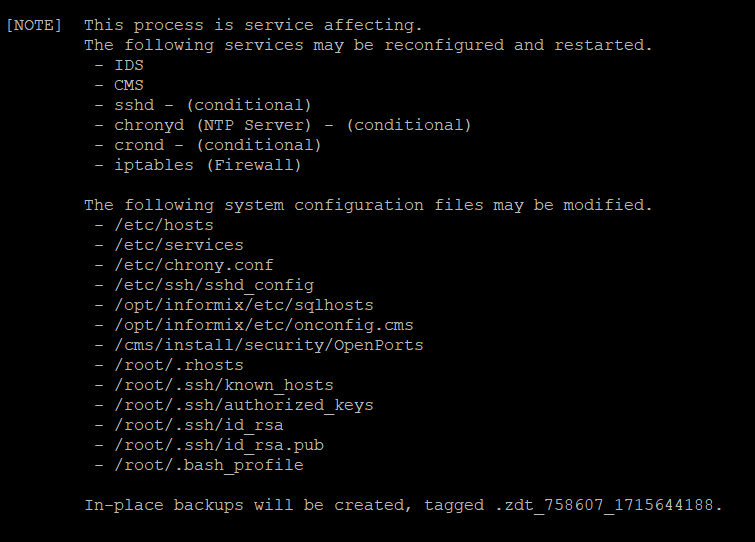
- When prompted, type y to proceed with the HA configuration process.
- Check the displayed information to ensure successful completion of the configuration process.
- To verify the HA configuration, run the
cat /etc/hostscommand and check whether the server details for the primary and secondary servers display correctly.