

AVAYA DOCUMENTATION CENTER
Find answers to your technical questions and learn how to use our products
Using Avaya Room System C100 Series
Avaya Room System C170 physical layout
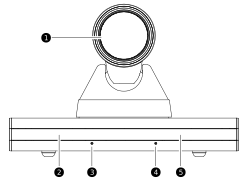
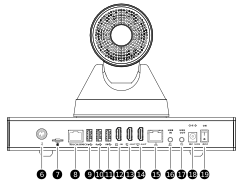
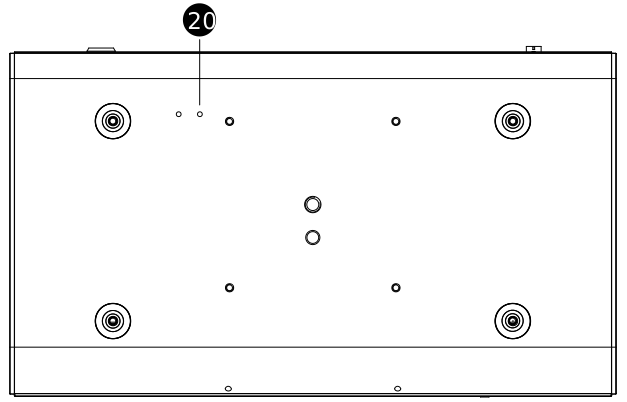
The following images and table give an overview of the physical layout of the Avaya Room System C170. The labels on the devices that you purchased might slightly differ, but the port function remains the same.
|
Number
|
Name
|
Description
|
|---|---|---|
|
1.
|
Camera
|
Built-in camera.
|
|
2.
|
Indicator
|
Status indicator.
|
|
3.
|
Microphone
|
Built-in microphone 1.
|
|
4.
|
Microphone
|
Built-in microphone 2.
|
|
5.
|
IR window
|
IR receiving window.
|
|
6.
|
MIC IN
|
MIC IN interface: to connect to an external microphone to receive audio.
|
|
7.
|
MicroSD card slot
|
Not supported.
|
|
8.
|
Touch/DMIC
|
To connect to a digital microphone. The digital microphone supports cascading.
|
|
9.
|
USB 3.0
|
USB 3.0 interface: to connect to an external USB drive, mouse, keyboard, or Avaya Room Microphone Speaker RA63.
|
|
10.
|
USB 3.0
|
USB 3.0 interface: to connect to an external USB drive, mouse, keyboard, or Avaya Room Microphone Speaker RA63.
|
|
11.
|
USB 3.0
|
USB 3.0 interface: to connect to an external USB drive, mouse, keyboard, or Avaya Room Microphone Speaker RA63.
|
|
12.
|
HDMI IN
|
HDMI IN interface: to connect to an external HD camera or computer.
|
|
13.
|
HDMI OUT1
|
HDMI OUT1 interface: to connect to an external HDTV or other display devices.
|
|
14.
|
HDMI OUT2
|
HDMI OUT2 interface: to connect to an external HDTV or other display devices.
|
|
15.
|
LAN
|
To connect to an Ethernet network.
|
|
16.
|
LINE IN
|
3.5 mm audio input interface.
|
|
17.
|
LINE OUT
|
3.5 mm audio output interface.
|
|
18.
|
DC 12V
|
Power interface.
|
|
19.
|
ON/OFF
|
Power switch.
|
|
20.
|
RESET
|
Reset button:
|