AVAYA DOCUMENTATION CENTER
Find answers to your technical questions and learn how to use our products
Deploying Avaya Aura® Communication Manager in Virtualized Environment
Deploying Communication Manager LSP on ASP R6.0.x (S8300 only) using KVM Cockpit
About this task
Communication Manager Simplex requires two network interfaces
Communication Manager provides a KVM OVA that contains two qcow2 files:
system.qcow2
Var_Disk.qcow2
Note:
Disk encryption is currently not supported for Communication Manager LSP when installing with cockpit, use CLI script-based deployment methods only.
Always follow A1SC output for deployment of applications on the host(s). There should never be more than one instance of a specific application on the same host.
Deployment of applications MUST be performed one at a time, and delete the artifacts prior to deploying the next application.
Before you begin
Download the Communication Manager KVM image from PLDS to your computer.
Login to the ASP R6.0.x CLI with custadm credentials.
Ensure that the staging folder exist: sudo ls -ld /var/lib/libvirt/staging
Ensure to remove the older images from the staging folder.
Ensure sufficient space is available in the staging folder to copy the KVM image.
If the staging folder does not exist, create it using the following commands:sudo mkdir /var/lib/libvirt/staging
sudo chown custadm:wheel /var/lib/libvirt/staging
drwxr-x---. 2 custadm wheel 6 Oct 23 14:32 /var/lib/libvirt/staging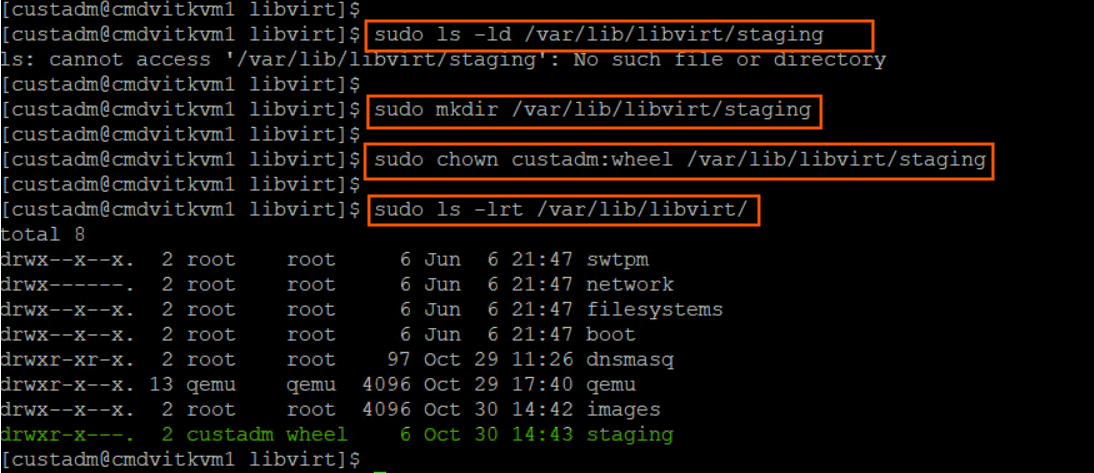
Copy the Communication Manager KVM image to the ASP R6.0.x host in /var/lib/libvirt/staging using the winscp tool and custadm credentials.
If not still in the CLI, login again to the ASP R6.0.x CLI with custadm credentials.
Ensure that the network bridge is configured during the KVM deployment.
Note:
All the following commands must be prefaced with “sudo”:
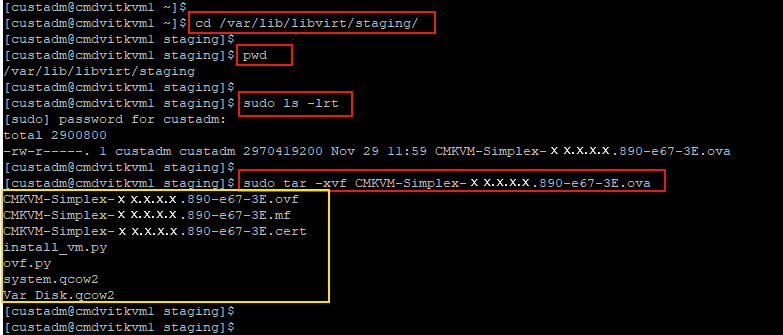
Run the following command to verify the Communication Manager KVM image available in the staging folder: sudo ls -lr /var/lib/libvirt/staging
Go to /var/lib/libvirt/staging folder, and run the following command to extract the ova file: sudo tar -xvf CMKVM-Simplex-010.2.0.0.229-e70-0.ova
KVM OVA file extracts the following files:
CMKVM-Simplex-010.2.0.0.229-e70-0.ovf
CMKVM-Simplex-010.2.0.0.229-e70-0.mf
CMKVM-Simplex-010.2.0.0.229-e70-0.cert
system.qcow2
Var_Disk.qcow2
The extracted qcow2 images are in thin provision format. The qcow2 images MUST be converted to thick provision. When running the commands to convert to thick provision, a unique identifier can be added to the new qcow2 image. Avaya recommends to use VM name as a unique identifier. For example:
CM10.2[unique identifier]-system.qcow2
CM10.2[unique identifier]-Var_Disk.qcow2
CM10.2-system.qcow2
CM10.2-Var_Disk.qcow2
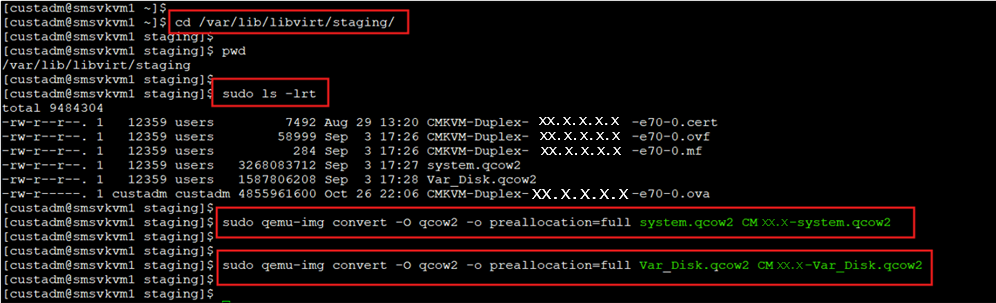
Go to /var/lib/libvirt/staging folder, and run the following command to convert system.qcow2 (thin) to CM10.2-system.qcow2 (thick) image:
sudo qemu-img convert -O qcow2 -o preallocation=full system.qcow2 CM10.2-system.qcow2
Go to /var/lib/libvirt/staging folder, and run the following command to convert Var_Disk.qcow2 (thin) to CM10.2Var_Disk.qcow2 (thick):
sudo qemu-img convert -O qcow2 -o preallocation=full Var_Disk.qcow2 CM10.2-Var_Disk.qcow2
To verify that the conversion is successful and verify the disk size, run the following commands:
sudo qemu-img info CM10.2-system.qcow2
Disk size must display as 14 GB
sudo qemu-img info CM10.2-Var_Disk.qcow2
Disk size must display as 50 GB
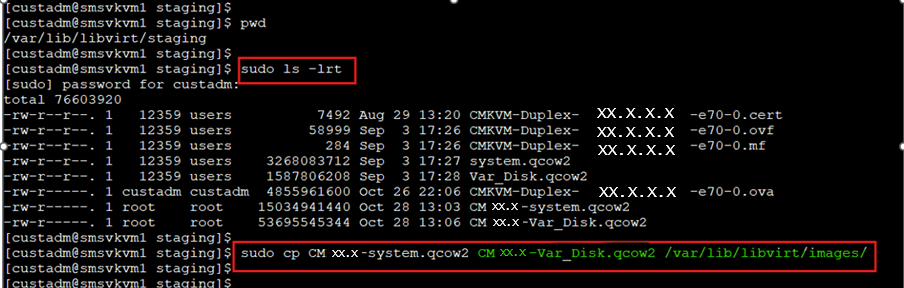
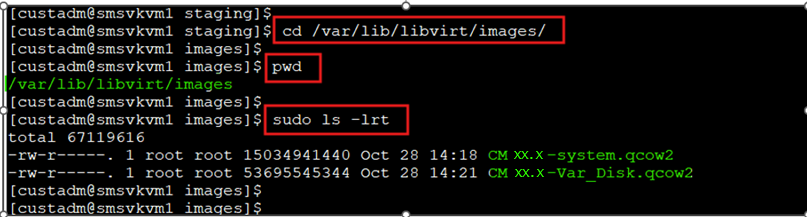
Go to /var/lib/libvirt/staging folder and run the following command to copy the CM10.2-system.qcow2 and CM10.2-Var_Disk.qcow2 to the /var/lib/libvirt/images directory:
sudo cp CM10.2-system.qcow2 CM10.2-Var_Disk.qcow2 /var/lib/libvirt/images
Go to /var/lib/libvirt/images directory and run the following command to verify the qcow2 images are present:
sudo ls –lrt
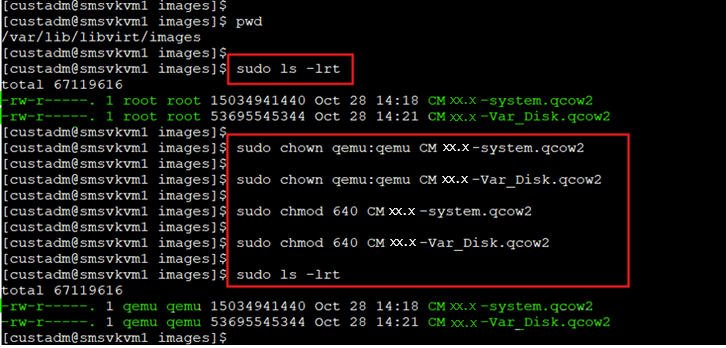
From the /var/lib/libvirt/images directory, run the following command to change the owner and permissions to 640 on the files:
sudo chown qemu:qemu CM10.2-system.qcow2
sudo chown qemu:qemu CM10.2-Var_Disk.qcow2
sudo chmod 640 CM10.2-system.qcow2
sudo chmod 640 CM10.2-Var_Disk.qcow2
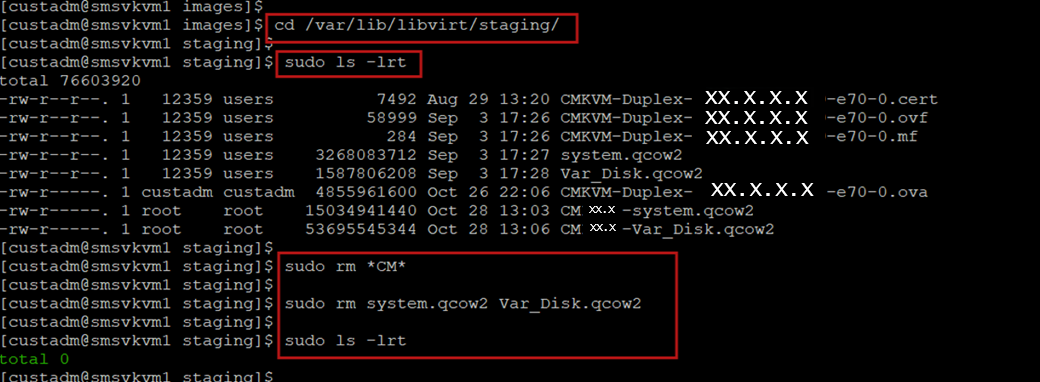
Go to /var/lib/libvirt/staging directory and remove all the extracted images and converted images. This is important to ensure that there is sufficient space for future deployments of KVM images. Do NOT remove files from the “images” directory.
cd /var/lib/libvirt/staging
sudo ls -lr
sudo rm *CM*
sudo rm system.qcow2 Var_disk.qcow2
Procedure
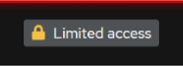
- For administration actions, on the top-right of the window, click on the Limited access button.
Figure : 1. Limited access button
Note:You require administrator access in order to view virtual machines. Administrator access is like root access. Ensure that you take care making updates.
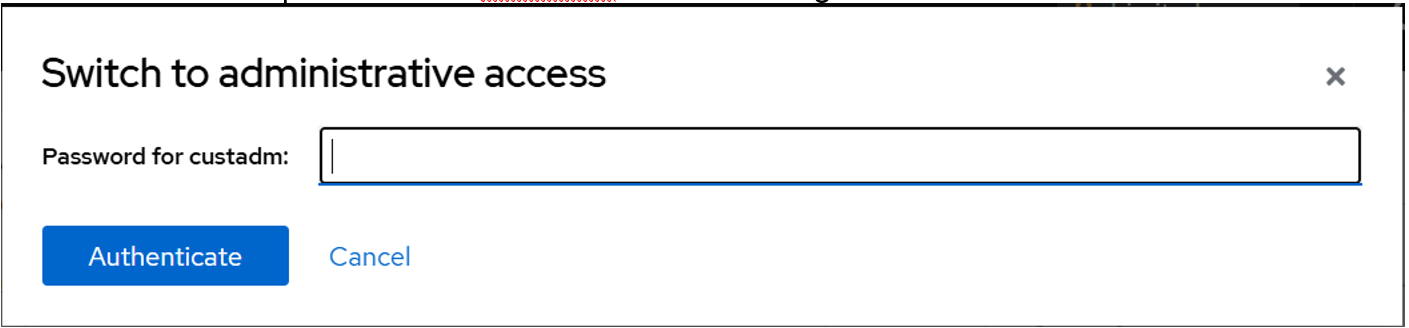
- In the Switch to administrative access window, enter the password for custadm.
Figure : 2. Switch to administrative access
The Limited access button on the top-right of the window changes to Administrative access.
Figure : 3. Administrative access button

- In the Import a virtual machine window, do the following:
- Click Import and edit.
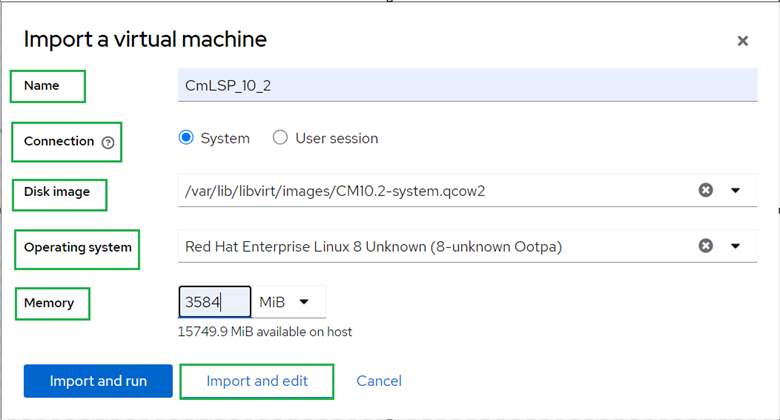
Virtual Machine details page appears.
Under the Disks section, verify the cm10.2Simplex-system.qcow2 disk image size is correctly displayed in the Capacity field.
Note:Communication Manager requires a total of 64 GB hard disk. In which, 14 GB is used for CM10.2-system.qcow2 and 50 GB is used for CM10.2-Var_Disk.qcow2.
By default, virtio is selected under the Bus field.
- Click Import and edit.
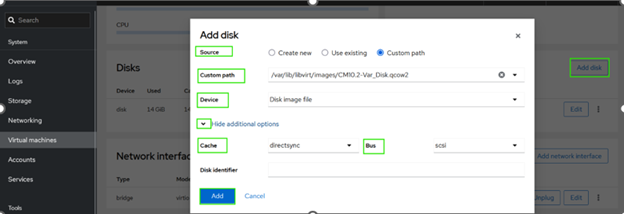
- Click Add disk to add CM10.2-Var_Disk.qcow2 disk image, and do the following:
- In the Source field, select Custom path.
- In the Custom path field, select CM10.2Simplex-Var_Disk.qcow2 image on the KVM host location path /var/lib/libvirt/images
- In the Device field, select Disk image file.
- Expand the Show additional options field.
- In the Cache field, select directsync.
- In the Bus field, select SCSI bus type.
- Click Add.
In the Disks section, verify that the two disk images are assigned correctly. The newly added disk must have the 50 GiB assigned under the Capacity and Used fields, scsi assigned under the Bus field, and directsync under the Cache field.
- In the Network interfaces section, click Edit and select the Network Bridge, and click Save.
Note:
Simplex Communication Manager requires two NICs:
NIC1 is for the Public IP address
NIC2 is for the Out of Band Management (OOBM)
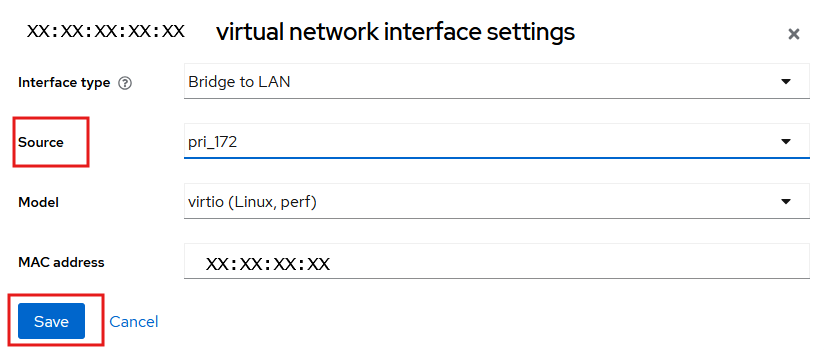
Ensure that two network interfaces are added for Communication Manager Simplex.
For Simplex Communication Manager, add OOBM Network.
- On the virtual machine, click Run to start the Communication Manager virtual machine.
Next Steps
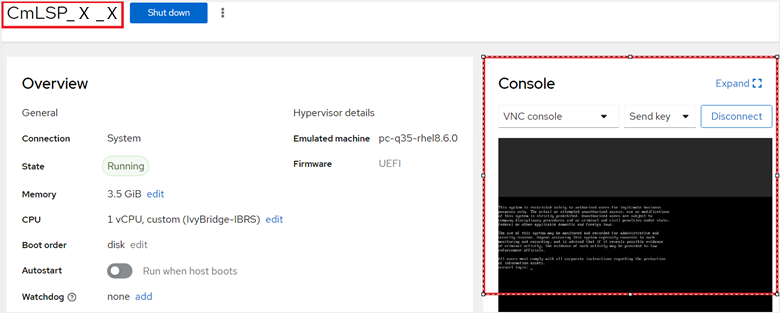
On first boot of the Communication Manager virtual machine, login to the virtual console using the craft/craft01 and provide the configuration and networking parameters.
Follow the Configuration steps described in the Communication Manager 10.2 deployment guide for standard Communication Manager configuration. These steps are the same regardless of the underlying hypervisor.
Application of Communication Manager Feature Packs, Service Packs, SSPs, Patches should then be performed. Note that these will need to be done using the Communication Manager CLI or Communication Manager SMI. SDM and SDM Client cannot currently be used with the new KVM on RHEL 8.10 hypervisor.
Existing instructions for installation of these artifacts using the CLI and UI are applicable. Note that the “snapshot” functionality present in ASP R5.1.x and earlier is replaced with an equivalent feature, titled Virtual Machine Backup. For more information about installing Service Packs or SSPs, see the Upgrading Avaya Aura® Communication Manager