Configuring duplex Communication Manager deployed on Amazon Web Services

Last Updated : Jun 10, 2026 |

Before you begin

You must install two Communication Manager instances for Duplex configuration, DuplexCM1 and DuplexCM2.

Procedure

  1. Open an SSH session to the new Communication Manager system with the IP address that you provided in the IP address field on the Configure Instance Details page.
  2. Log in with the user name as configuser and password as configuser01.
    Note:

    You must log in with configuser credentials when logging in for the first time. Once you log in, Communication Manager enables all other user logins and disables configuser.

  3. In Do you accept the terms of this EULA? (Y)es/(N)o, type y.
  4. In Enter region of AWS, type the region name.
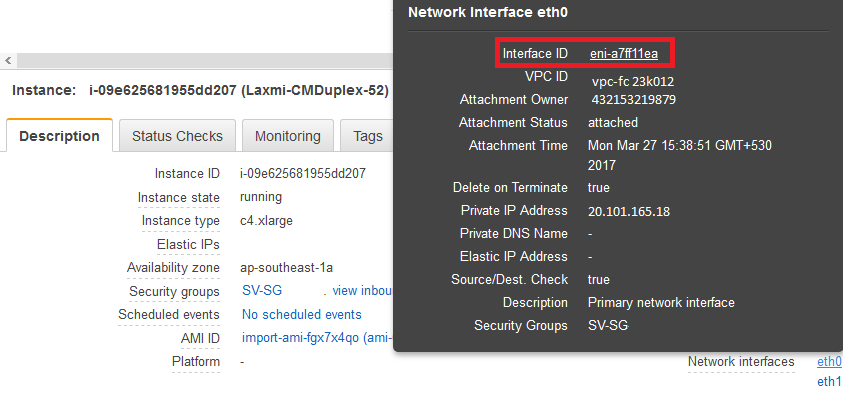
  5. In Enter this VM network interface id mentioned on AWS EC2 console, type the eth0 network interface ID of the Communication Manager DuplexCM1.
    Warning:

    The duplex Communication Manager instances require HTTPS access to Amazon EC2 APIs (ec2.<region>.amazonaws.com) to reconfigure the virtual IP address on interchange.

    In private VPC with no NAT or virtual private gateway, it is possible to use AWS Private Link in an interface VPC endpoint allowing private access to Amazon EC2 without the need of a NAT gateway. If the DNS cannot be configured to map ec2.<region>.amazonaws.com to the new interface VPC endpoint, then use the /etc/hosts file to associate the EC2 FQDN to the new VPC endpoint.


    Instance Network Interface ID

  6. In Enter other VM network interface id mentioned on AWS EC2 console, type the eth0 network interface ID of the other Communication Manager DuplexCM2.
  7. In Enter the alias/floating ip, type the floating IP address of the Duplex Communication Manager.

    The system configures the settings and then reboots automatically.

  8. Log in with the user name as craft and password as craft01.
  9. When the system prompts to create a customer privileged administrator account, enter the login details to create an account.

    From Communication Manager Release 7.1 onwards, during the initial configuration, you must create the Communication Manager privileged administrator account credentials. The craft credentials will not work to log in to the Communication Manager System Management Interface for further configuration.

  10. In Enable Avaya Services EASG Access, type:
    • y to enable EASG.

    • n to disable EASG.

      Note:

      By disabling EASG, you are denying Avaya access to the system. This setting is not recommended as it can affect Avaya’s ability to provide support for the product. Unless the customer can manage the product, do not disable Avaya Services Logins.

  11. After the configuration is complete, log in to the Communication Manager System Management Interface with the Communication Manager privileged administrator credentials.

Next Steps

Perform the same procedure for the Communication Manager DuplexCM2. In this case, the values in Step 5 and Step 6 must be reversed.