Deploying Communication Manager Software-only ISO using the OS console

Last Updated : Jun 10, 2026 |

About this task

Use this procedure to deploy Communication Manager ISO image in a Software-only environment.

Note:

The deployment of Avaya Aura® applications as software only is available but a restricted offer for net new deployments and requires Avaya Aura® BU approval before proceeding. If you have a business requirement to deploy Avaya Aura® as software only, please get in touch with your Avaya Sales team. Existing customers using software only deployments continue to be supported.

Before you begin

  • Create an operating system instance.

  • Ensure that you have the required hard disk space on the RHEL machine. For more information, see the Disk partitioning section.

  • Ensure that the RHEL instance should be able to communicate with a public RHEL repo or your private repo for the latest RPM updates.

  • Ensure that the Linux installation uses 'eth <x> names for the network interfaces.

  • The virtual machines must support at least 2 network interfaces for duplex configurations. On Azure 'accelerated networking' interfaces should not be enabled.

  • SSH to the RHEL virtual machine and create a root password.

  • Download the Avaya Aura® application ISO file to the virtual machine.

Procedure

  1. Switch to root user by using the following command: sudo su
  2. Create the iso directory under the mnt folder.

    For example, mkdir /mnt/iso.

  3. Run the following command to mount the ISO file:
    mount -o loop,ro CM-010.2.0.0.*.iso /mnt/iso

    Running this command extracts all the files from the Avaya Aura® ISO zip folder.

  4. Run the following command to navigate to the iso file:
    cd /mnt/iso
  5. To enable php 7.4 and nginx 1.20, run the following commands:
    1. yum module reset -q -y php
    2. yum module enable -y php:7.4
    3. yum module reset -q -y nginx
    4. yum module enable -y nginx:1.20
    5. yum update -y php
    6. yum update -y nginx-filesystem*
  6. Run the following command to install the dependent RPMs:
    yum install --setopt=install_weak_deps=false -y /mnt/iso/avaya-cm-setup-010.2.*.noarch.rpm

    A message appears that the RPMs installation is complete. To check the RHEL version, run the following command: cat /etc/redhat-release.

  7. Run the ./install-cm file to start the installation.
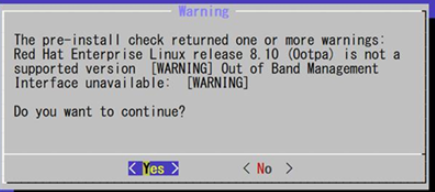
    Note:

    When you install the Communication Manager ISO image on RHEL 8.10, the following warning message is displayed. You can ignore this warning message and proceed to the next step:


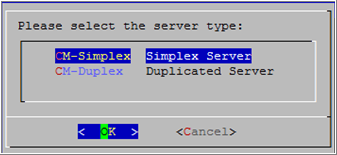
  8. Select the required server type as Simplex Server and click OK.


  9. Select the required number of users and click OK.

    For more information on supported footprints, see Supported footprints information for respective environments.

  10. If the Out of Band Management interface is not needed and missing, accept the Out of Band Management prompt and click Yes.
  11. Press any key to read the EULA.
  12. Read the software license terms and enter y to accept the agreement.
  13. Read the system configuration details and click Accept.
  14. Enter the following Avaya Aura® application details as prompts appear and click OK:
    • IPv4 address

      Note:

      IP addresses should be left as is since the IP addresses must match with that configured on the Cloud virtual networks. Also, IPv6 addresses are not supported in cloud virtual networks. Leave the IPv6 fields blank.

    • IPv4 netmask

    • IPv4 gateway

    • IPv6 address (Optional)

    • IPv6 network prefix (Optional)

    • IPv6 gateway (Optional)

    • Hostname

    • NTP servers IP address or hostnames (Optional)

    • DNS servers IP address (Optional)

    • Domain search list (Optional)

    • WebLM server IP address on which the Avaya Aura® application license is installed, and it MUST be reachable.

    • Privileged Administrator login user ID

    • Password for the administrator login user

  15. In the Enhanced Access Security Gateway (EASG) screen, click Enable or Disable.
  16. Verify the Avaya Aura® application details that you have entered and click Next.
  17. In the Warning screen, click OK to complete the installation and reboot the computer.

    CLI displays the status of the Avaya Aura® application installation and the server reboot.

    Note:

    If you want to restore Communication Manager data during backup and restore, disable waagent by using the sudo systemctl stop waagent command.