

AVAYA DOCUMENTATION CENTER
Find answers to your technical questions and learn how to use our products
Using the Solution Deployment Manager client
Adding an Avaya Solutions Platform 130 Dell R640 Server in Solution Deployment Manager Client through the Services port
This section includes the steps for adding the Avaya Solutions Platform 130 (ASP 130) server into the Solution Deployment Manager client for the application OVA deployment.
- Download and install the SDM client on your computer or laptop.
ADDITIONAL INFORMATION:For more information about installing SDM Client, see Installing the Solution Deployment Manager client on your computer.
- Ensure that the computer is connected to the services port of the ASP 130 server.
ADDITIONAL INFORMATION:For more information, see the “ASP 130 Installation Configuration Script” section in the Installing the Avaya Solutions Platform 130 Series Release 5.0 document.Note:The ASP 130 Installation Configuration Script is formerly known as the Services Port Script.
- Start the Solution Deployment Manager client.
- Click Application Management.
- Add a location.
- To add the ASP130 (ESXi) host, on the Platforms tab, in the Platforms for Selected Location <location name> section, click Add.
ADDITIONAL INFORMATION:Important:When adding the ASP 130 host in SDM Client, use the FQDN as ASP 130 is an ESXi deployment. If the FQDN cannot be resolved with the DNS Server, you have to edit the /etc/hosts file on the computer or laptop to include the host information. For more information, see Adding the ASP 130 host information into the /etc/hosts file
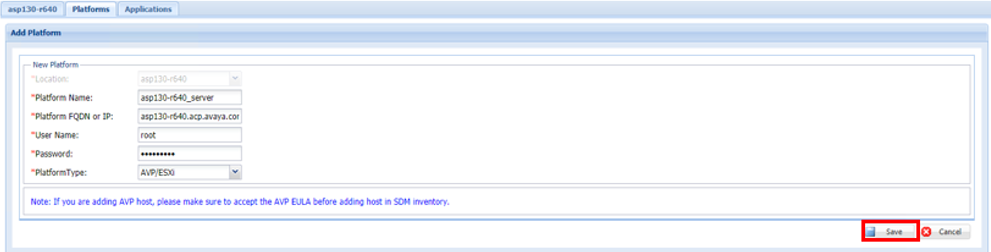
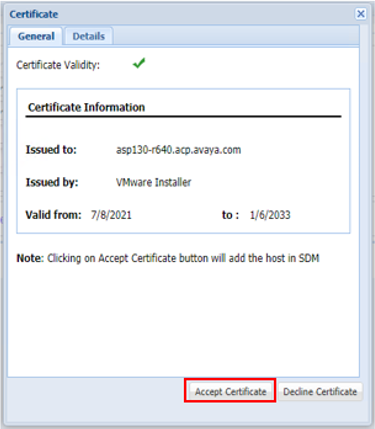
- Click Save and then click Accept Certificate.
ADDITIONAL INFORMATION:
 Important:
-
If you receive a certificate error when trying to add the ASP 130 server, see Regenerating the self-signed certificate on an ASP 130 host to overcome the issue if an SSL certificate is used.
-
Third-party CA signed certificates are supported on the ASP 130 server and can be successfully added into SDM Client by using a CA signed certificate. The certificate must use or include the FQDN, as the host can only be added into SDM using the FQDN. IP address is not supported. If a CA signed certificate is required to be regenerated, see the “Certificate Administration” section in the Installing the Avaya Solutions Platform 130 Series Release 5.0 document.
-
A license must be installed on the ASP 130 ESXi host to successfully add the host in SDM Client.
-
- After the ASP 130 server is added into SDM Client, deploy the supported applications.