

AVAYA DOCUMENTATION CENTER
Find answers to your technical questions and learn how to use our products
Using the Solution Deployment Manager client
Regenerating the self-signed certificate on an ASP 130 host
This section covers the procedure to regenerate the self-signed certificate on an ASP 130 ESXi host, if it fails with a certificate error while adding the server into SDM Client.
Note:
-
This activity can be conducted remotely and does not affect the service for the virtual machines running on the ESXi host. It is still strongly recommended to conduct this activity in a customer approved maintenance window, during off-peak business hours.
-
The ESXi host is not required to be entered into maintenance mode to conduct this activity.
Other:
Avoid administrative tasks such as, creating backups, taking VM snapshots, or making any configuration changes to the ESXi host when conducting this activity.
Before you begin
Ensure you have the following:
-
Access to the ASP 130 server management network through the direct services port connection onsite
-
SSH tool (that is, PuTTY)
-
Root password for server access
- SSH in to the ASP 130 host using PuTTY. Log in with the root credentials.
- Run the following command to confirm if the host FQDN and host name are present:
ADDITIONAL INFORMATION:cat /etc/hostsADDITIONAL INFORMATION:If the FQDN and host name are defined, proceed to step 9.ADDITIONAL INFORMATION:If the FQDN and host name are not defined, proceed to the next step.ADDITIONAL INFORMATION:
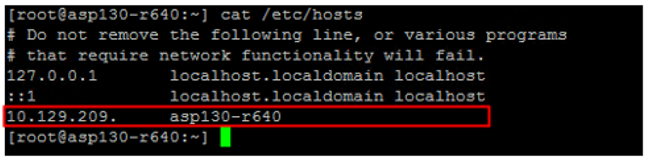
- Log in to the ASP 130 host through the vSphere Web Client with the root credentials.
- Go to .
ADDITIONAL INFORMATION:

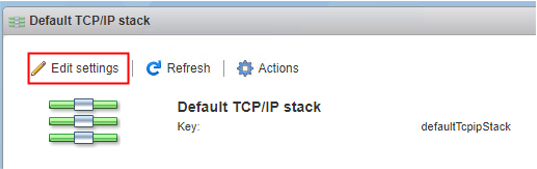
- Click Edit settings.
ADDITIONAL INFORMATION:
- If the Host name, Domain name, and Primary DNS server fields are blank, type the required information.
ADDITIONAL INFORMATION:
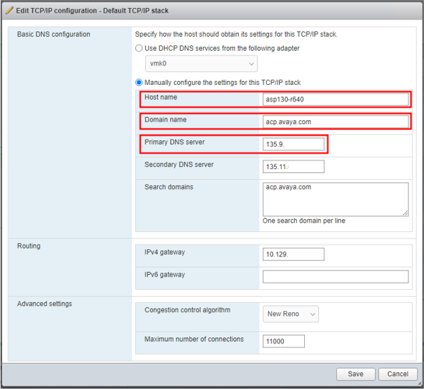
- Click Save to apply the changes.
- Return to the SSH session and run the following command to confirm that the IP, FQDN, and host name are now present in the /etc/hosts file of the ESXi host:
ADDITIONAL INFORMATION:cat /etc/hosts
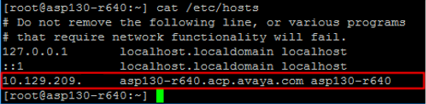
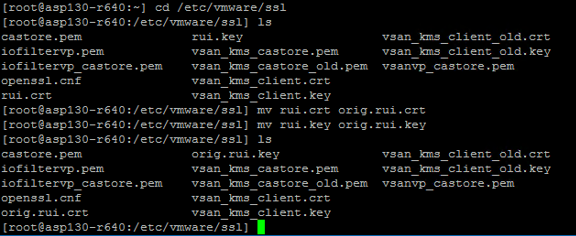
- Type cd /etc/vmware/ssl to change the directory, and back up the existing certificates by renaming them using the following commands:
ADDITIONAL INFORMATION:mv rui.crt orig.rui.crtmv rui.key orig.rui.keyADDITIONAL INFORMATION:Note:If this is a fresh install with a factory staged ASP 130 server, it is not required to copy these certificate files.
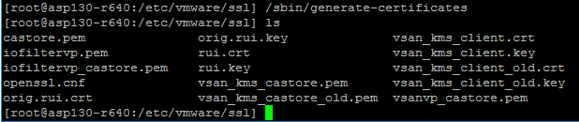
- To generate new certificates, type the following command:
ADDITIONAL INFORMATION:/sbin/generate-certificates
- To restart the hostd Management Agent service on the ESXi host, type the following command:
ADDITIONAL INFORMATION:/etc/init.d/hostd restart
- After the host restarts, to power on the VMs, click .
- Return to the SSH session and confirm that the host successfully generated new certificates by running the following commands:
ADDITIONAL INFORMATION:cd /etc/vmware/sslopenssl x509 -in rui.crt -noout -text
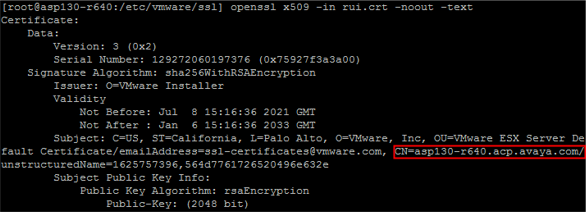 Confirm in the subject the CN= entry displays the FQDN of the ASP 130 host.
 - Launch the SDM client to add the ASP 130 as an ESXi host and accept the certificate.
- Deploy the supported application OVAs on the ASP 130 host.