

AVAYA DOCUMENTATION CENTER
Find answers to your technical questions and learn how to use our products
Using the Solution Deployment Manager client
Upgrading System Manager from Release 7.x or 8.0.x to Release 10.2.x through services port by using Solution Deployment Manager Client
The procedure describes the steps to upgrade Appliance Virtualization Platform-based System Manager Release 7.x or 8.0.x to System Manager Release 10.2.x.
Note:
If you are upgrading System Manager Release 7.x or 8.0.x to Release 10.2.x by using the Solution Deployment Manager client then the license files will be retained. However, you need to install the license file for System Manager Release 10.2.x.
- Upgrade Appliance Virtualization Platform and AVP Utilities.
- Log in to the AVP Utilities CLI with administrative credentials.
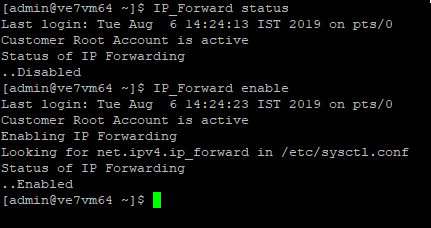
- To check the IP forward status, type the IP_Forward status command.
ADDITIONAL INFORMATION:If the IP forward status is disabled, type the IP_Forward enable commandFollowing is an example of checking the IP forward status and enabling the IP forward status.
- To configure laptop with below configuration for System Manager, go to , do the following:
- Select the Use the following IP address option.
- In the IP address field, type 192.11.13.5.
- In the Subnet mask field, type 255.255.255.252.
- In the Default Gateway field, type 192.11.13.6
Following is an example for changing the configuration for the System Manager upgrade.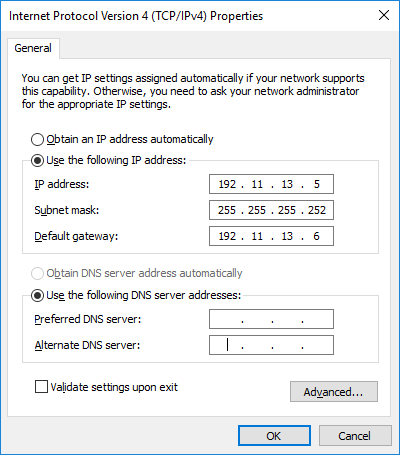
- To re-establish trust with System Manager that is already deployed on the added Appliance Virtualization Platform host, do the following:
- On the Applications tab, in the Applications for Selected Location <location name> area, select System Manager.
- Click .
ADDITIONAL INFORMATION:If you need to re-establish trust with System Manager Release 7.0, select the version as 7.0.Following is an example of re-establishing trust with System Manager.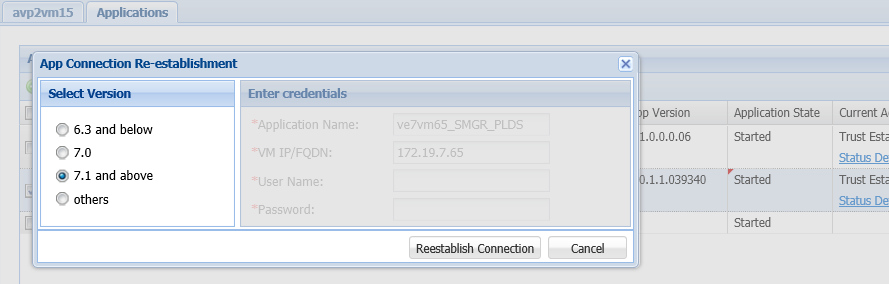 ADDITIONAL INFORMATION:Wait for 3 to 5 minutes for trust establishment to complete without any error as shown in the below screen shot.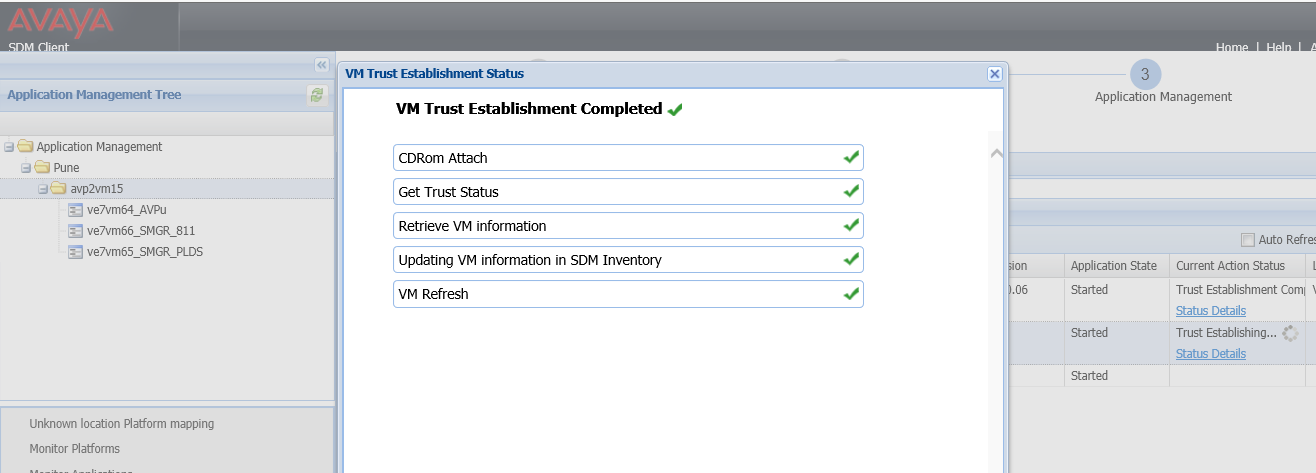
- After re-establishing trust with System Manager, click Upgrade Management.
STEP RESULT:On the Upgrade Management page, the system displays the System Manager virtual machine.
- On the Upgrade Management page, select the System Manager virtual machine, and then click Upgrade.
STEP RESULT:The system displays the SMGR Upgrade window.
- In Platform FQDN, select the required host.
- Select the datastore on the host.
ADDITIONAL INFORMATION:If more than one datastore is available, select the datastore.
- Click Next.
- On the OVA tab, click one of the following:
-
URL, in OVA File, type the absolute path of the same local windows computer or the http URL accessible from the same local windows computer of the System Manager OVA file, and click Submit.
-
S/W Library, in File Name, select the System Manager OVA file from the drop-down list.To use the S/W Library option, the OVA file must be present in the local software library directory that is defined during the Solution Deployment Manager client installation. The system displays the directory name when the S/W Library option is selected.
-
Browse, select the required OVA file from your local computer, and click Submit File.
-
Browse from DatastoreFor information about the Pre-staging feature, see Using the Solution Deployment Manager client.This option is applicable only for System Manager Release 10.1 and later.
ADDITIONAL INFORMATION:When you select the OVA, the system:-
Displays the CPU, memory, and other parameters in the Capacity Details section.
-
Disables the Flexi Footprint field.
-
- To upload the data migration utility file, click the Data Migration tab, and click one of the following:
-
URL, and type the absolute path of the same local windows computer or the http URL accessible from the same local windows computer of the latest data migration utility file.
-
S/W Library, and select the latest data migration utility file from the drop-down list.The data migration utility file must be present in the local software library directory.
-
Browse, and select the latest data migration utility file from your local computer, and click Submit File.
-
- To upload the latest service or feature pack, select the Service or Feature Pack tab, and click one of the following:
-
URL, and type the absolute path of the same local windows computer or the http URL accessible from the same local windows computer of the latest service or feature pack.
-
S/W Library, and select the latest service or feature pack from the drop-down list.
-
Browse, and select the latest service or feature pack from your local computer, and click Submit File.
-
- Click Next.
- In the Config Parameters section, provide the required details.
ADDITIONAL INFORMATION:Note:Use the same Management FQDN and Time Zone as configured on the old System Manager.For information, see
Upgrade Management field descriptions
. - In the Network Parameters section, select the required Public and Out of Band Management network interface details.
- Click Upgrade and accept the license terms.
ADDITIONAL INFORMATION:The system takes the backup, shuts down the existing virtual machine (VM), deploys the OVA file, and restores the data on the new virtual machine.
- To view the status, in the Upgrade Status column, click Status Details.
ADDITIONAL INFORMATION:The complete process takes about 100–150 minutes depending on the data on System Manager.Note:The upgrade process might involve multiple reboots during data migration. If you have selected the checkbox Require Encryption Pass-Phrase at Boot-Time, you must monitor the VM console for reboots and enter the Encryption Pass-Phrase promptly.If you fail to enter the Encryption Pass-Phrase timely, the upgrade process may timeout and fail. If this happens, restart the upgrade process.
- Do one of the following:
-
If the upgrade is successfully completed, do the following:
-
Verify that the new System Manager virtual machine is functional.For more information, see
Verifying the functionality of System Manager
. -
Click Commit.The system deletes the old virtual machine.If you already performed the Commit operation or manually deleted the older VM (For example, <vm_name>_old) after successful upgrade on host itself. In these cases, if you re-attempt the Commit operation then Solution Deployment Manager displays the warning message Unable to find <vm_name>_old on the Commit status page.
-
-
If the upgrade fails or you want to revert to the old system, click Rollback.The system deletes the newly created virtual machine and starts the old virtual machine.
-