

AVAYA DOCUMENTATION CENTER
Find answers to your technical questions and learn how to use our products
Deploying IP Office as an Avaya Cloud Office ATA Gateway
Adding the ACO line
This document does not cover the configuration of other equipment such as the customer network, firewalls, and any SBC equipment.
You need to configure the line using the user details obtained from Avaya Cloud Office™ (see Setting up the ACO user phone details).
This process covers adding a new ACO line to the IP Office system configuration for calls to/from Avaya Cloud Office™. The IP Office only requires a single ACO line.
- Load the IP Office configuration in IP Office Manager.
- Click
 Line in the navigate pane. Click the icon and select ACO Line.
 - Select the ACO tab:
ADDITIONAL INFORMATION:
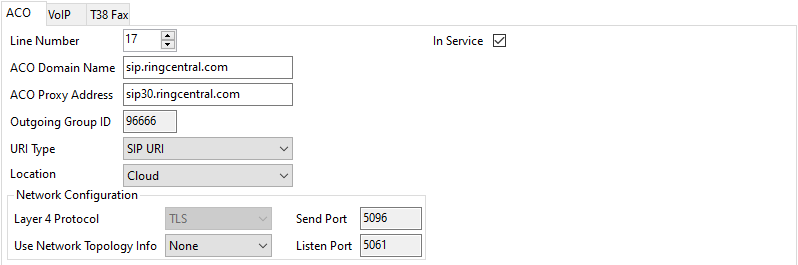
-
Use the values obtained when setting up the ACO user phone details to configure the ACO line:
ACO ValueIP Office Line ValueSIP Domainwithout the port number.Outbound proxywithout the port number. -
- Note the Line Number. You need to use this value to create an incoming call route for calls from Avaya Cloud Office™. Change the value if required.
- Set the Use Network Topology Info setting to match the requirements of the customer's network and internet connection:
ADDITIONAL INFORMATION:
-
None - The system determines routing for the line using address matches in the IP Office system's routing tables.
-
LAN1LAN2 - Use the matching LAN's settings.
-
- Select the VoIP tab. Check that the settings match the following defaults.
- Select the T38 Fax tab. Check that the tab is set to Use Default Values.
- Click the
 icon.
icon.
Next steps
-
Go to Edit the system short codes.