Replacing the PERC H730P RAID Controller

Last Updated : Aug 07, 2025 |

Before you begin

Ensure that you locate the following components on the system motherboard:

Refer to the label located on the inside of the server lid.

  1. PERC H730P Controller

  2. PERC H730P Controller cable connector (SAS Cables)

Caution:

Always practice safe electrostatic discharge procedures. For more information, see Electrostatic discharge safety.

Warning:

These steps are service impacting, conduct this activity during a customer approved maintenance window.

Procedure

  1. Power down the server according to Avaya's application instructions and disconnect the system from the electrical outlet by removing both power cords.
  2. Open the server lid and locate the PERC H730P card located in the rear of motherboard. See Figure : 1 or refer to the label of the server motherboard on inside of the server lid and refer to figure Figure : 1 below.
  3. Disconnect the storage controller cable from the PERC H730P card connectors.
    1. Remove the two screws that secure the cable to the PERC card.
    2. Grasp the cable on both sides of the cable connector and pull the cable up and away from the PERC card.
  4. Angle the PERC card so that the other end of the card disengages from the storage-controller card holder on the system motherboard.
  5. Lift the PERC card up and out of the system.
  6. With the replacement PERC H730P card, align one end of the card with the card holder on the system motherboard.
  7. Lower the other end of the PERC card into the card holder on the system board.
  8. Connect the storage controller cable to the PERC card.
    1. Grasp the cable on both sides of the cable connector and connect to the PERC card.
    2. Attach the two screws to secure the cable to the PERC card.
  9. SAS data cables should be reused. No routing or connecting to the SAS disk drive backplane should be necessary. If SAS cables have been disconnected ensure SAS data cables are connected securely and correctly to the connectors on the PERC card. Route SAS data cables through the clip on the card and through the channel on the inner side of the chassis. Attach connector labeled SAS A to connector SAS A on the backplane. Perform the equivalent procedure for the SAS B connector.
  10. If Raid battery is not installed in replacement PERC card remove from the failed PERC card and insert in the new replacement PERC card. See the Raid Battery chapter.
    Figure : 1. Removing and installing the PERC 9 mini monolithic card

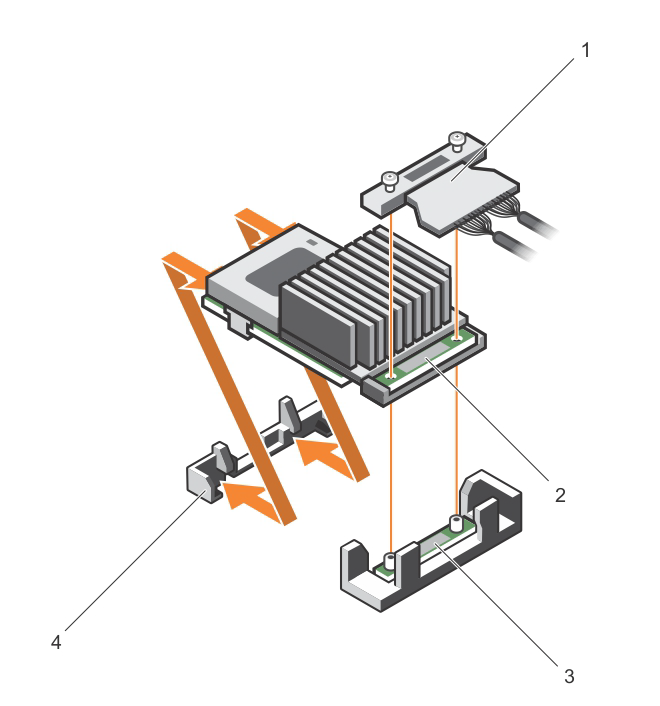
    1. Storage Controller Cable (SAS Cables)

    2. Storage Controller Card

    3. Storage Controller card holder

    4. Storage Controller retention hook