

AVAYA DOCUMENTATION CENTER
Find answers to your technical questions and learn how to use our products
Installing the Avaya Solutions Platform 130 Series
Configuring KVM on Red Hat Enterprise Linux 9.6 Network Settings
Use this procedure to configure KVM on Red Hat Enterprise Linux 9.6 Network Settings.
Before you begin
Ensure that you have the following:
-
Dell R660xs Server
-
Console VGA Monitor
-
USB Keyboard
-
Laptop with a SSH emulator (for example, putty)Note:Ensure the SSH client used is the latest version available to ensure compatibility with both ASP R6.0.x and ASP R7.x cryptographic policy.
-
Rufus software (for a reinstall/remaster only)
Note:
A new ASP 130 R7.x (Dell R660xs) will ship from the Avaya integrator with ASP R6.0.x (KVM on RHEL 8.10) pre-loaded.
- Media for new installations and upgrades is required to go into the bottom USB slot on the back of the server since it is the only USB slot that is USB 3.0 compliant.
- Connect a VGA monitor and USB keyboard to the front ports of the server. Connections for the VGA monitor and USB keyboard are also located on the rear of the server.
ADDITIONAL INFORMATION:Note:If the monitor is connected to the front VGA port, the rear VGA port will not function.
-
The monitor and keyboard are required to enable and configure the iDRAC and to update R660xs BIOS/Firmware (if necessary).
-
During bootup of server you press F2 to enable and configure iDRAC. See iDRAC chapter for details. See ASP 130 Series iDRAC 9 Best Practices for configuration steps.
-
If any BIOS/FW updates are required, they will be posted in a PSN available on support.avaya.com.
-
- Remove faceplate to access front VGA and USB ports.
ADDITIONAL INFORMATION:The following pictures are just a representation and should only be used as an example.ADDITIONAL INFORMATION:
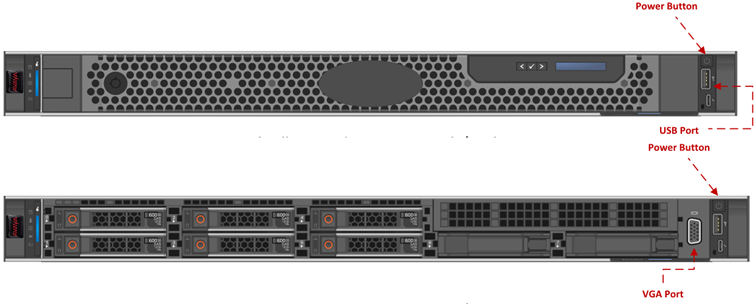 There are two options when configuring the host:
-
Monitor and keyboard
-
Services laptop
-
Change laptop address to 192.11.13.5 with a subnet mask of 255.255.255.252.
-
Connect laptop to services port.
-
If using the services laptop, once server is powered up, launch a SSH session to the KVM on RHEL host. (192.11.13.6).
-
-
- Power on the server.
ADDITIONAL INFORMATION:The initialization process will take a few minutes. Do not press any additional keys until prompted to do so.
- Login using credentials: custadm/ACP130_pw. The configuration script will ask to change the custadm password at first login. ASP R7.x requires a 14 character or greater password. Passwords can be a mix of uppercase, lowercase, numbers and special characters.
ADDITIONAL INFORMATION:The example below is using the console for access. If connected via the services port, after retyping the new password, the SSH session will terminate. Re-establish the SSH session and login with the new custadm credentials.
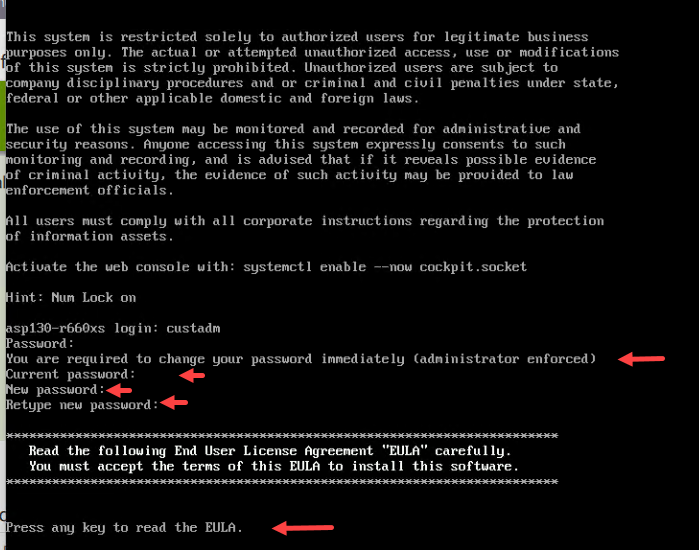
- Read and accept the EULA.
ADDITIONAL INFORMATION:After the EULA is accepted, the Red Hat cockpit will be accessible from a PC connected to the services port using the URL https://192.11.13.6:9090. The SSH access will also be available from a PC connected to the services port (at 192.11.13.6). This can be used in case you do not have a keyboard and monitor connected.
- The configuration script will ask if EASG needs to be Enable or Not. Answer as required. Avaya highly recommends EASG be enabled to facilitate troubleshooting.
ADDITIONAL INFORMATION:
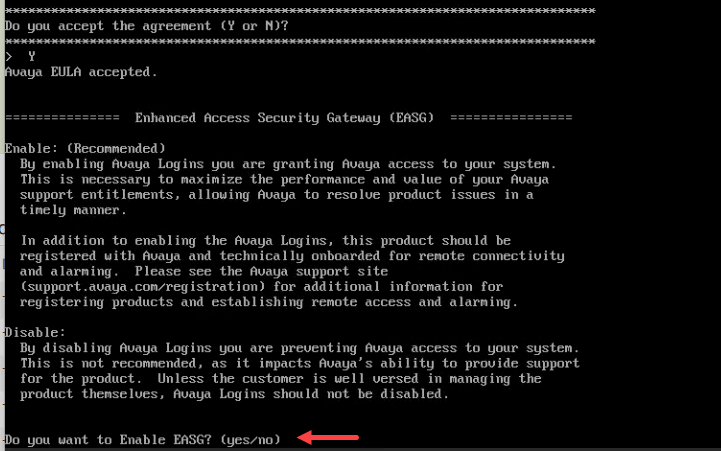
- The Configuration script will ask to change the root account password.
ADDITIONAL INFORMATION:
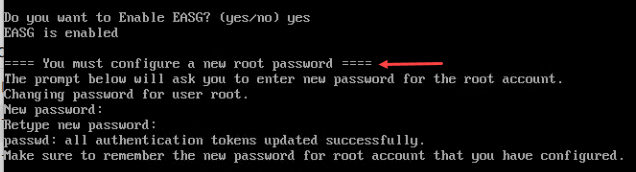
- For ASP R7 encrypted deployments ONLY - Configure Disk Encryption Passphrases.
ADDITIONAL INFORMATION:Note:Avaya strongly recommends a 14 character or greater passphrase. Passphrases can be a mix of uppercase, lowercase, numbers and special characters.Customers must securely store and maintain passphrases for recovery purposes.Warning:If the LUKS recovery passphrase is lost, the encrypted data cannot be recovered. Restoring the system will require a complete OS & application reinstallation.
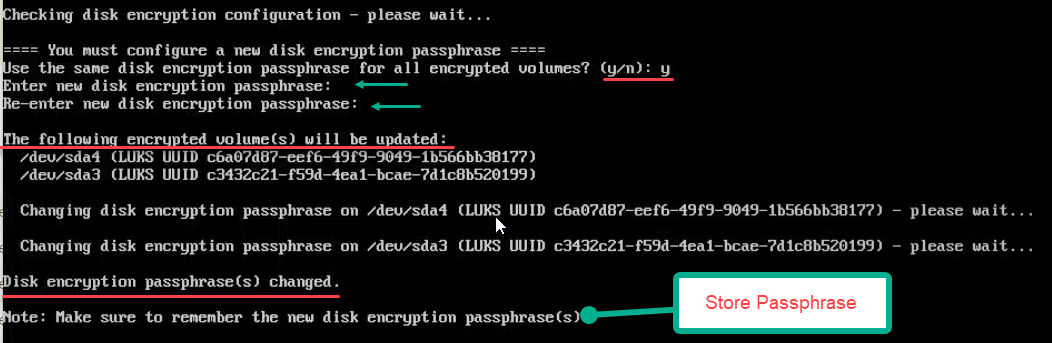
- If configuring the same passphrase for both SCSI disk 3 & 4 (sda3/sda4), type y, enter passphrase, then repeat passphrase.
ADDITIONAL INFORMATION:
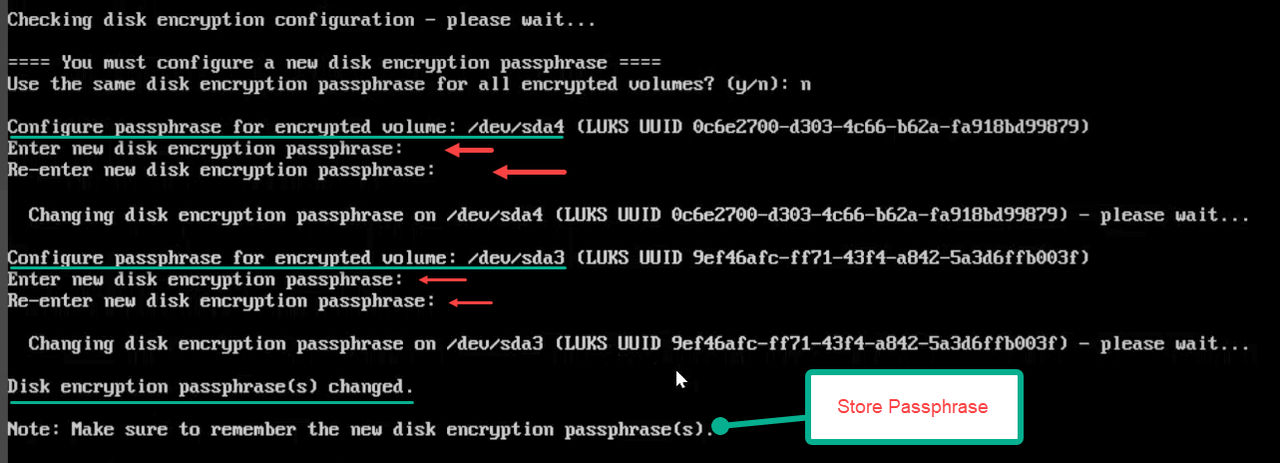
- If configuring unique passphrase for sda3 & sda4, type n, enter passphrase for sda4 then repeat passphrase for sda4, then enter passphrase for sda3 then repeat passphrase for sda3.
ADDITIONAL INFORMATION:
- If configuring the same passphrase for both SCSI disk 3 & 4 (sda3/sda4), type y, enter passphrase, then repeat passphrase.
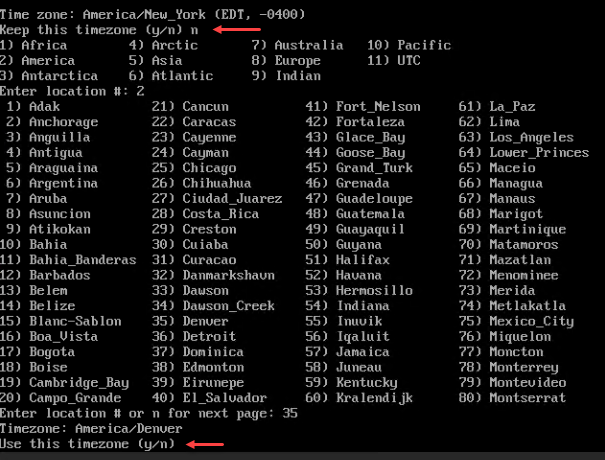
- Follow the prompts to configure the time zone.
ADDITIONAL INFORMATION:
- Follow the prompt to configure the following parameters:
- Enable/Disable OOBM
ADDITIONAL INFORMATION:Reference Securing Network Configuration (OoBM) prior to making desired selections.
- Assign a VLAN ID
- Server hostname
- Server domain
- Server IPv4 address
- Server netmask
- IPv4 default gateway
- IPv6 (optional)
- DNS server(s) comma separated
- IPv4 Domain search
- Continue with these values (y = continue, n = retry, q = quit)
ADDITIONAL INFORMATION:Note:‘Enter Server domain’ option will only be displayed if user enters a ‘shortname’ in the ‘Enter Server hostname’ field. If an FQDN is entered, prompt will skip to ‘Enter Server IPv4’ field.Pressing d will delete the existing value for those fields where the user is required to enter a value.Ensure that Bridge bridge0: IP initialization successful is displayed after continuing with the above values.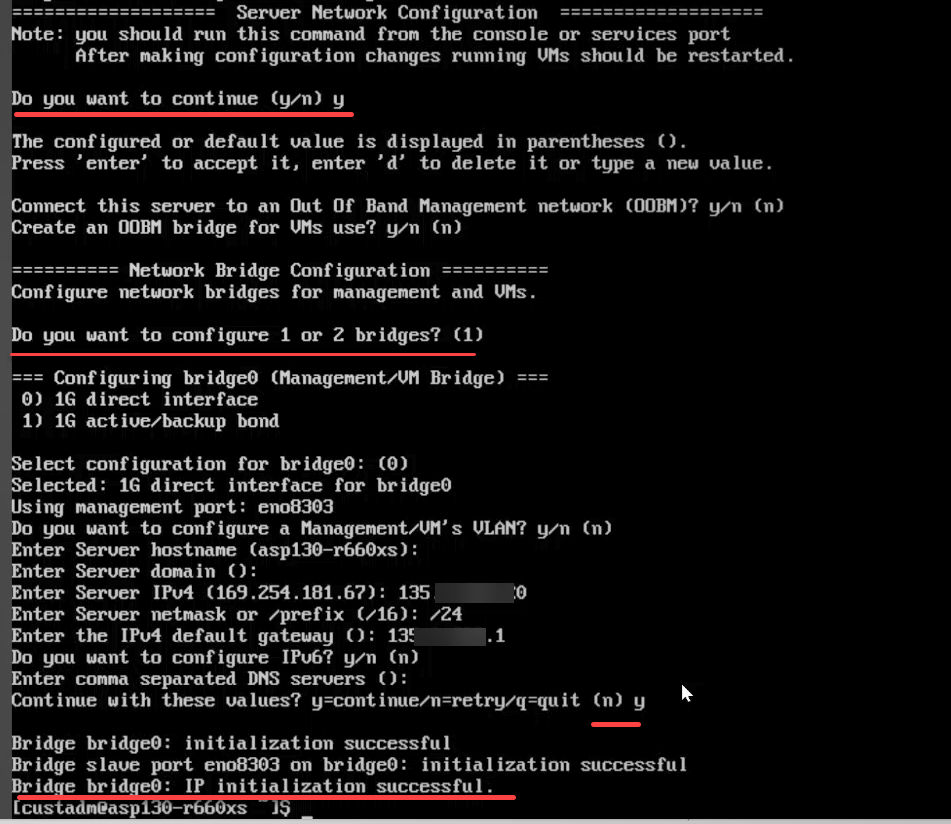
- Enable/Disable OOBM
- Run the command ip addr and verify your network information is correct. An active network link needs to be connected for IP information to display.
ADDITIONAL INFORMATION:Note:
-
Services port IP address will only be displayed if an active link is connected to eno8403 (NIC 2).
-
Look for bridge0 and ensure IP address and mask assigned above is present.
-
Search for bridge0. RHEL dynamically assigns numbers that will identify the interface (example 1 first time loaded KVM on RHEL assigned ID 9 to bridge0, 2nd time loaded assigned ID 182 to bridge0).
-
The configNetwork command can be used later to change values.
[custadm@asp130-r660xs ~]$ ip addr
 1: lo: <LOOPBACK,UP,LOWER_UP> mtu 65536 qdisc noqueue state UNKNOWN group default qlen 1000
     link/loopback 00:00:00:00:00:00 brd 00:00:00:00:00:00
     inet 127.0.0.1/8 scope host lo
        valid_lft forever preferred_lft forever
     inet6 ::1/128 scope host
        valid_lft forever preferred_lft forever
 2: eno8303: <BROADCAST,MULTICAST,UP,LOWER_UP> mtu 1500 qdisc mq master bridge0 state UP group default qlen 1000
     link/ether a8:3c:a5:05:97:86 brd ff:ff:ff:ff:ff:ff
     altname enp1s0f0
 3: eno8403: <NO-CARRIER,BROADCAST,MULTICAST,UP> mtu 1500 qdisc mq state DOWN group default qlen 1000
     link/ether a8:3c:a5:05:97:87 brd ff:ff:ff:ff:ff:ff
     altname enp1s0f1
 4: eno12419: <NO-CARRIER,BROADCAST,MULTICAST,UP> mtu 1500 qdisc mq state DOWN group default qlen 1000
     link/ether d4:04:e6:81:17:3c brd ff:ff:ff:ff:ff:ff
     altname enp63s0f0
 5: eno12429: <NO-CARRIER,BROADCAST,MULTICAST,UP> mtu 1500 qdisc mq state DOWN group default qlen 1000
     link/ether d4:04:e6:81:17:3d brd ff:ff:ff:ff:ff:ff
     altname enp63s0f1
 6: eno12399: <NO-CARRIER,BROADCAST,MULTICAST,UP> mtu 1500 qdisc mq state DOWN group default qlen 1000
     link/ether d4:04:e6:81:17:3a brd ff:ff:ff:ff:ff:ff
     altname enp62s0f0
 7: eno12409: <NO-CARRIER,BROADCAST,MULTICAST,UP> mtu 1500 qdisc mq state DOWN group default qlen 1000
     link/ether d4:04:e6:81:17:3b brd ff:ff:ff:ff:ff:ff
     altname enp62s0f1
  9: bridge0: <BROADCAST,MULTICAST,UP,LOWER_UP> mtu 1500 qdisc noqueue state UP group default qlen 1000
     link/ether a8:3c:a5:05:97:86 brd ff:ff:ff:ff:ff:ff
     inet 172.16.20/24 brd 172.16.20.255 scope global noprefixroute bridge0
        valid_lft forever preferred_lft forever
-
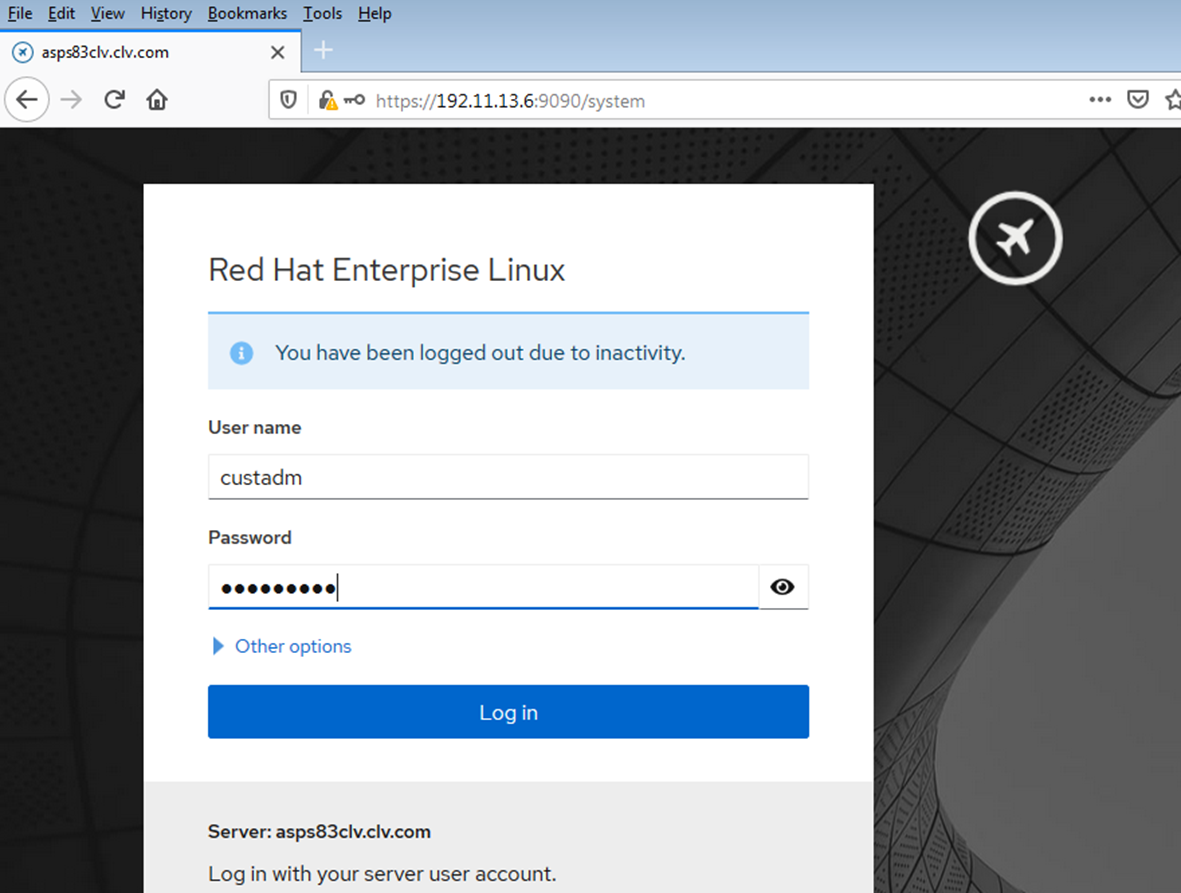
- Log in to Cockpit by opening a browser and enter the IP address you assigned to as Server IPv4 and append port 9090 to it. Login and verify system parameters. Login using the custadm credentials.
ADDITIONAL INFORMATION:
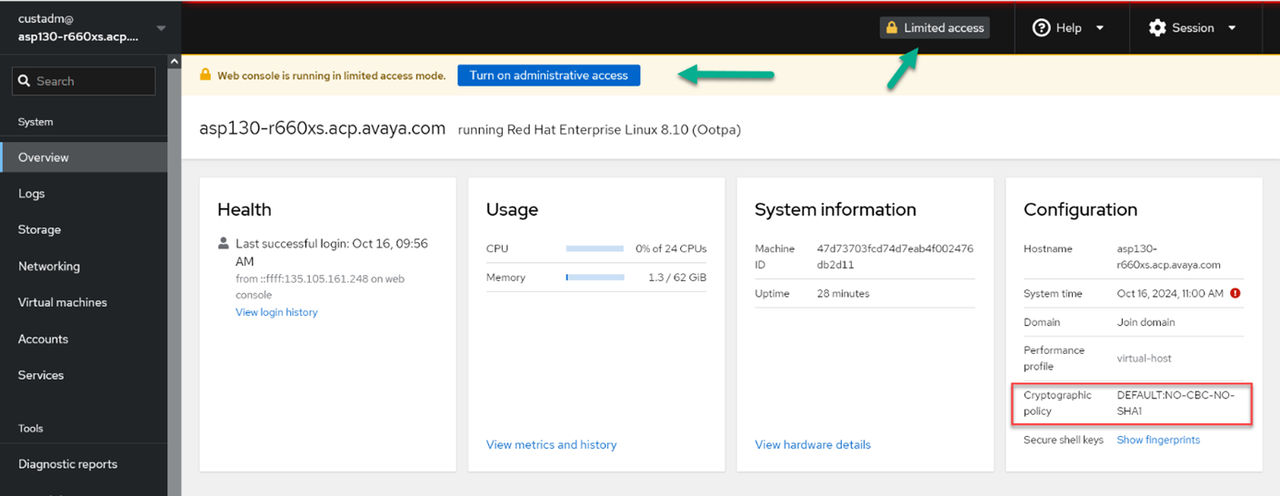
- Once logged in, view the Overview page and additional tabs for configuration verification. Additional configuration can be performed from this interface. Verify that the Performance profile and the Cryptographic policy matches the image below. This indicates that the installation completed successfully. Cockpit is now available for additional configuration and deployment of VMs.
ADDITIONAL INFORMATION:
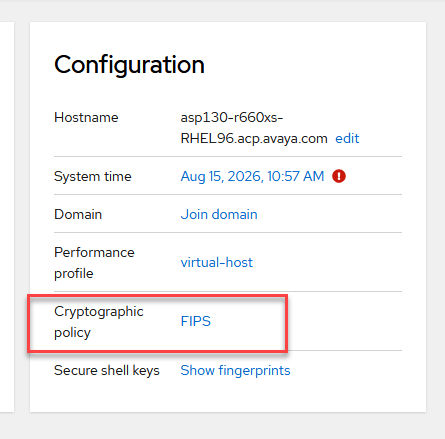
 Note:ASP R7.x encrypted deployments ONLY will come standard with Cryptographic policy set to FIPS.
- For administration actions, click on the button labelled Limited access.
ADDITIONAL INFORMATION:

- Enter the password for custadm at the message box below.
ADDITIONAL INFORMATION:
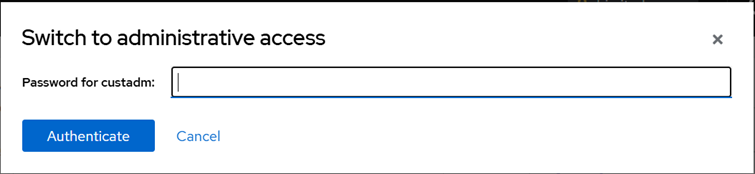 The button at the top will change to show Administrative access.
 Caution:Administrative access means root equivalent access. Be careful with what you do.
- The screen shot below shows the /var/lib/libvirt partition. Within this partition, a directory /var/lib/libvirt/images is created and is intended to store the VM disk images (QCOW2) that will be used for VM deployment.
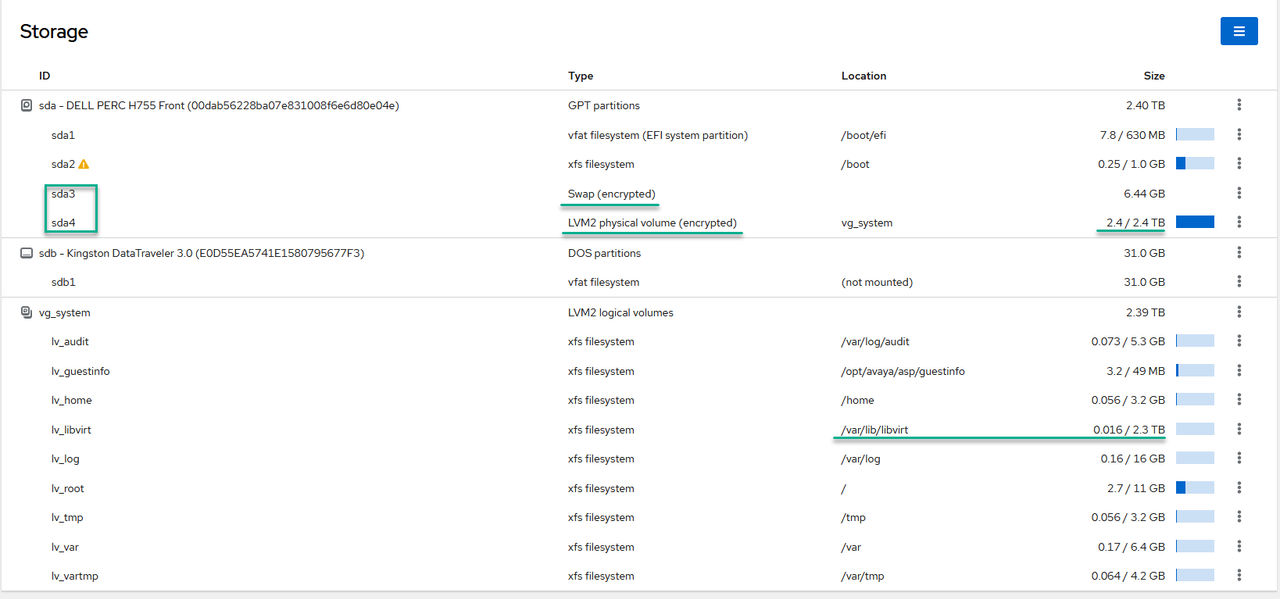
ADDITIONAL INFORMATION:Note:It is expected behavior for the sda4 LVM2 physical volume to appear full in Cockpit. During software installation, the server pre-allocates all remaining available storage to this volume group, and Cockpit reports this total allocation rather than the used space.Tip: You can view the actual available disk space for your individual file systems by running df -h via the CLI:
[custadm@asp130-r660xs-RHEL96 ~]$ df -h
 Filesystem                          Size  Used Avail Use% Mounted on
 devtmpfs                            4.0M     0  4.0M   0% /dev
 tmpfs                                63G     0   63G   0% /dev/shm
 tmpfs                                26G   26M   26G   1% /run
 efivarfs                            304K  197K  102K  66% /sys/firmware/efi/efivars
 /dev/mapper/vg_system-lv_root        10G  2.6G  7.5G  26% /
 /dev/mapper/vg_system-lv_guestinfo   47M  3.1M   44M   7% /opt/avaya/asp/guestinfo
 /dev/mapper/vg_system-lv_home       3.0G   54M  2.9G   2% /home
 /dev/mapper/vg_system-lv_var        6.0G  163M  5.8G   3% /var
 /dev/sda2                           958M  236M  723M  25% /boot
 /dev/mapper/vg_system-lv_tmp        3.0G   54M  2.9G   2% /tmp
 /dev/mapper/vg_system-lv_vartmp     4.0G   61M  3.9G   2% /var/tmp
 /dev/mapper/vg_system-lv_log         15G  155M   15G   2% /var/log
 /dev/mapper/vg_system-lv_libvirt    2.2T   16G  2.2T   1% /var/lib/libvirt
 /dev/sda1                           599M  7.5M  592M   2% /boot/efi
 /dev/mapper/vg_system-lv_audit      5.0G   70M  4.9G   2% /var/log/audit
 tmpfs                                13G     0   13G   0% /run/user/1001
Note:The screenshots below are representative of systems with 600 GB HDDs. The /var/lib/libvirt size varies based on server hardware profile and size of HDDs installed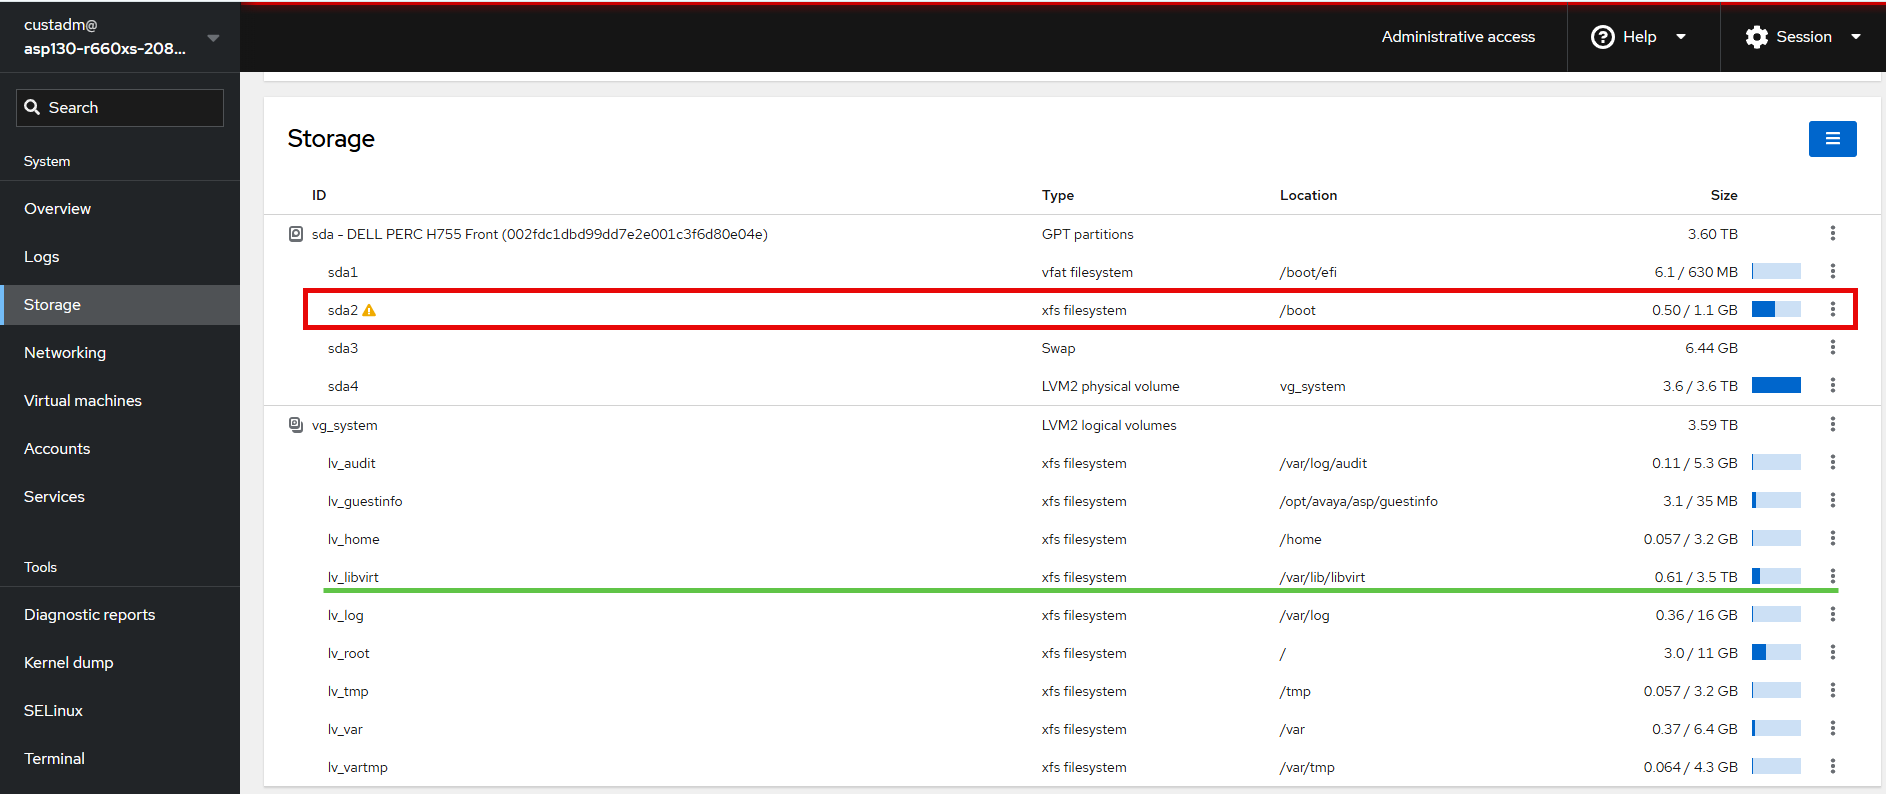 For ASP R7 Encrypted deployments, sda3 and sda4 display the encrypted label.
- The following sda2 warning (yellow triangle) can be ignored if it matches the message shown below. You must investigate any other warnings. Reach out to Avaya Services if necessary.
ADDITIONAL INFORMATION:The sda2 LVM2 physical volume shows a yellow (triangle!) warning icon. Clicking on it will show the following kind of message:
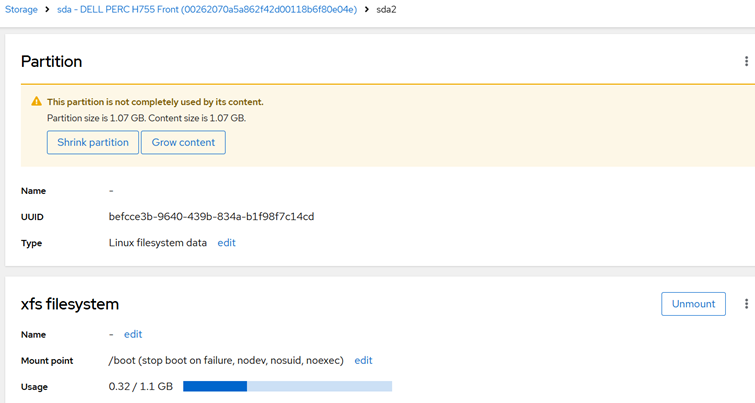 Caution:Do not attempt to modify, shrink, or create additional partitions, as doing so will disrupt system operations and result in an unsupported configuration.
- Configure NTP server by clicking on the value of the System time field (Turn on administrative access). In the Set time field, change the combo box to “Automatically using additional NTP servers”. A new field for NTP server will be shown.
ADDITIONAL INFORMATION:The system defaults to the RHEL 9 default NTP pool configuration. But those often will not work from within customers’ networks and it is considered a best practice to have the hosts configured to an authoritative time (NTP) server. For security reasons, Avaya recommends synchronizing the clock with a time server that is located on the management network (Customer private network) rather than directly with a time server on a public network.Note that there are three options available in the Set time field: Manually (set date/time explicitly), Automatically using NTP (RHEL 9 default NTP pool configuration), and Automatically using additional NTP Servers (enter customer specific NTP servers).

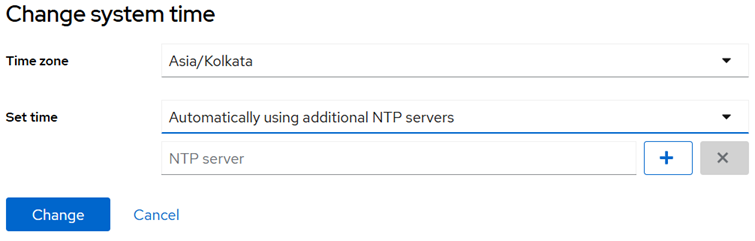
- Enter either the IP Address or FQDN (DNS required) of the NTP server (example: time.abc.com) and click Change. The system time should get synchronized after a few minutes.
- The hostname (along with domain) can be changed by clicking on Edit beside the Hostname field.
- Under Real host name enter FQDN of server (ex. abc1.avaya.com).
- Do not enter short name (enter FQDN).
- Ignore Pretty host name entry (leave blank).
ADDITIONAL INFORMATION: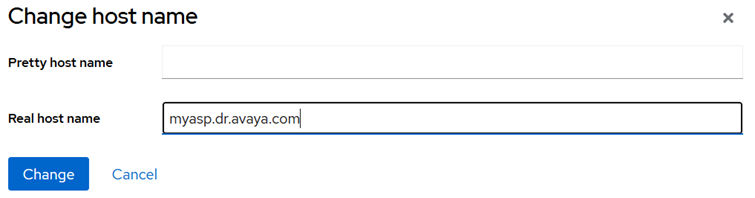
- Enter the hostname (along with domain) in the field Real host name and click Change.
ADDITIONAL INFORMATION:Note:If a remaster/new install, don’t forget to remove jump drive from the system. It is not mounted and can be removed.Important:Do not make any changes/edits beyond what is documented in this manual as it will result in an unsupported configuration. This includes attempting to grow or shrink partitions.