

AVAYA DOCUMENTATION CENTER
Find answers to your technical questions and learn how to use our products
Installing the Avaya Solutions Platform 130 Series
Signing the Certificate Signing Request (CSR) by an Organizational CA
In this example, the Avaya Aura® System Manager application will be used to sign the CSR file generated in KVM during Generating the certificate signing request in KVM on RHEL 9.6.
Alternatively, customers can sign certificate signing request (CSR) with a Microsoft Windows server when configured to act as a Certificate Authority (not included by Avaya). Reference to Microsoft documentation for installing and configuring CA as well as signing requests.
Note:
Customers using an external, trusted CA to sign CSR i.e. VeriSign, DigiCert, Symantec can skip and proceed with the next section Replacing SSL certificates in Cockpit with a CA signed certificate.
Note:
Depending on the Avaya Aura® System Manager version, steps and screens may slightly vary. Always refer to the latest, available Avaya Aura® System Manager documentation available at https://support.avaya.com.
Before you begin
-
Creating the Certificate configuration file for KVM on RHEL 9.6 host and Generating the certificate signing request in KVM on RHEL 9.6 must be completed prior to continuing.
-
Access to an Avaya Aura® System Manager server.
-
Transfer the CSR file asp130-r660xs-RHEL96.acp.avaya.com.csr file to a local computer that has access to the Avaya Aura® System Manager acting as CA.
-
User account with administrative privileges in Avaya Aura® System Manager e.g., admin account.
- Using a Web browser, enter the Avaya Aura® System Manager IP address or FQDN.
- Login with administrative credentials. For example, admin
- Navigate to .
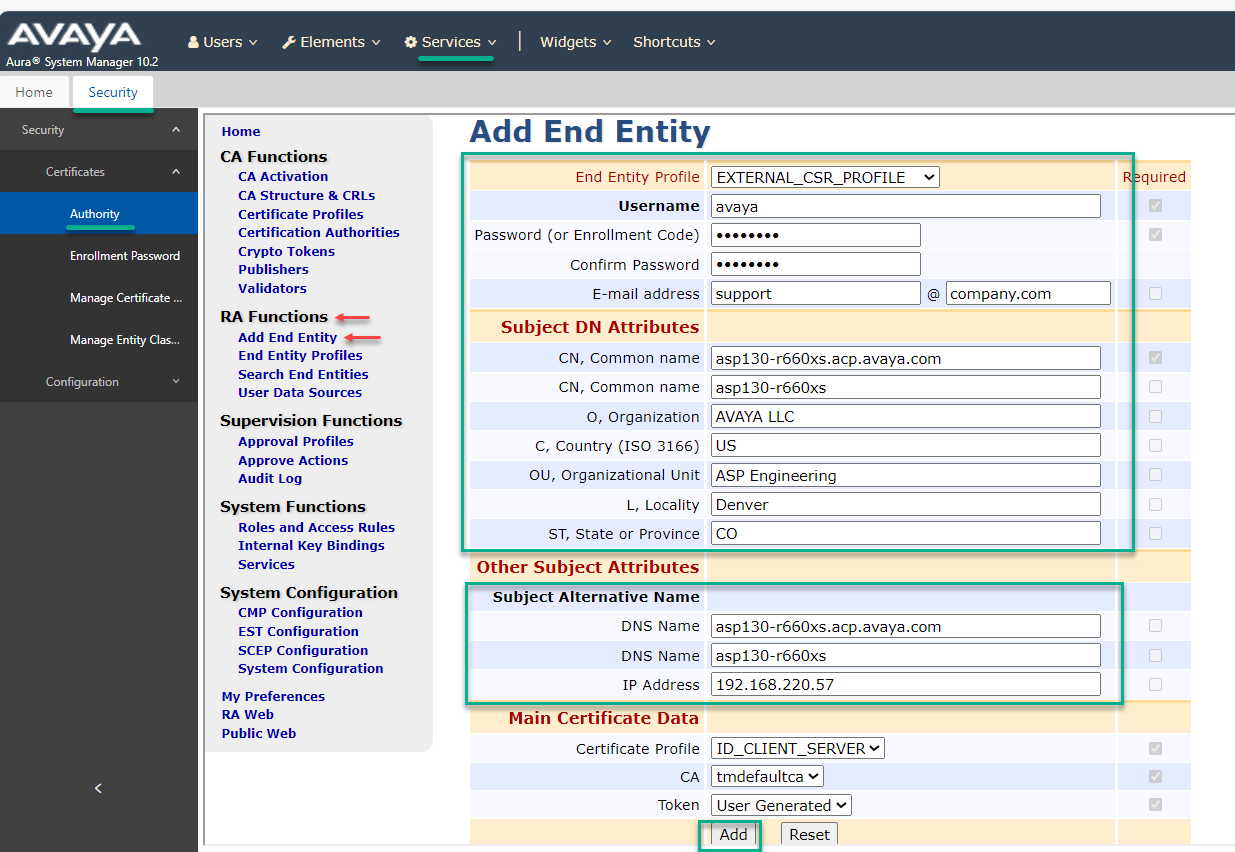
- Under RA Functions, select Add End Entity.
- Enter the following information in the respective fields for the following fields:
ADDITIONAL INFORMATION:Username:
-
End Entity Profile: EXTERNAL_CSR_PROFILE
-
Username: Enter any desired username. For example, avaya
-
Password (or Enrollment code): Enter any desired password. For example, avaya123
-
Confirm Password: avaya123
-
E-mail address (optional): Same value used if configured in the certificate configuration file asp130-r660xs-1.cfg during Creating the Certificate configuration file for KVM on RHEL 9.6 host.
Subject DN Attributes-
CN, Common name: Same value set in the asp130-r660xs-1.cfg (for example) configuration file during Creating the Certificate configuration file for KVM on RHEL 9.6 host.
-
O, Organization: Same value set in the asp130-r660xs-1.cfg (for example) configuration file during Creating the Certificate configuration file for KVM on RHEL 9.6 host.
-
C, Country (ISO 3166): Same value set in the asp130-r660xs-1.cfg (for example) configuration file during Creating the Certificate configuration file for KVM on RHEL 9.6 host.
-
OU, Organizational Unit: Same value set in the asp130-r660xs-1.cfg (for example) configuration file during Creating the Certificate configuration file for KVM on RHEL 9.6 host.
-
L, Locality: Same value set in the asp130-r660xs-1.cfg (for example) configuration file during step Creating the Certificate configuration file for KVM on RHEL 9.6 host.
-
ST, State or Province: Same value set in the asp130-r660xs-1.cfg (for example) configuration file during Creating the Certificate configuration file for KVM on RHEL 9.6 host.
Subject Alternative Name-
DNS Name: Enter the DNS.1 value set in the asp130-r660xs-1.cfg (for example) configuration file during Creating the Certificate configuration file for KVM on RHEL 9.6 host.
-
DNS Name: Enter the DNS.2 value set in the asp130-r660xs-1.cfg (for example) configuration file during Creating the Certificate configuration file for KVM on RHEL 9.6 host.
-
IP Address: Enter the KVM on RHEL 9.6 host IP value set in the asp130-r660xs-1.cfg (for example) configuration file during Creating the Certificate configuration file for KVM on RHEL 9.6 host.
-
- Review and save:
ADDITIONAL INFORMATION:
-
Review and compare the values typed with the ones in the configuration file created during steps in the Creating the Certificate configuration file for KVM on RHEL 9.6 host asp130-r660xs-1.cfg.
-
When ready, click the Add button to save the changes and create the new Entity.
STEP RESULT:New entity will be displayed.
-
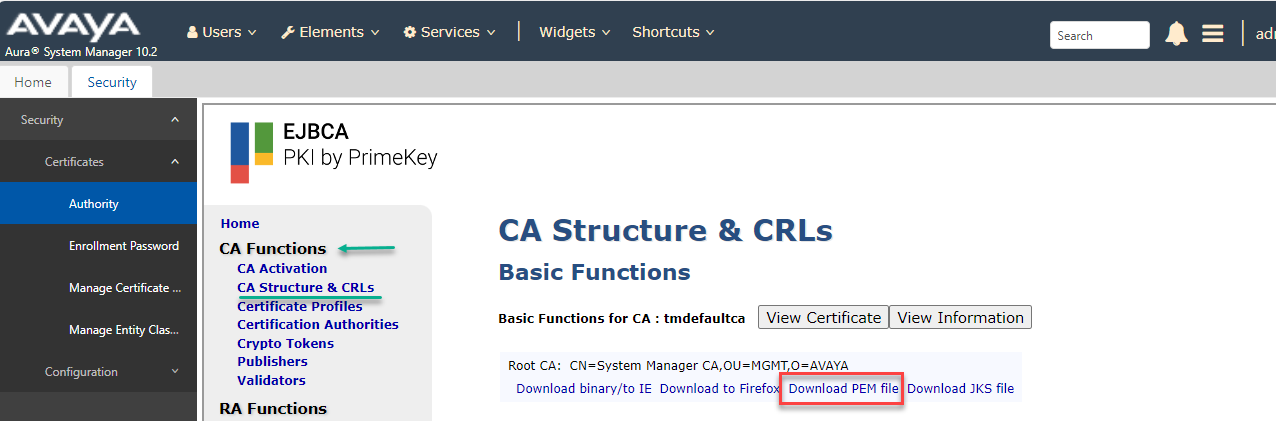
- From the middle column menu, under CA Functions, select CA Structure & CRLs.
- Click on Download PEM file.
ADDITIONAL INFORMATION:
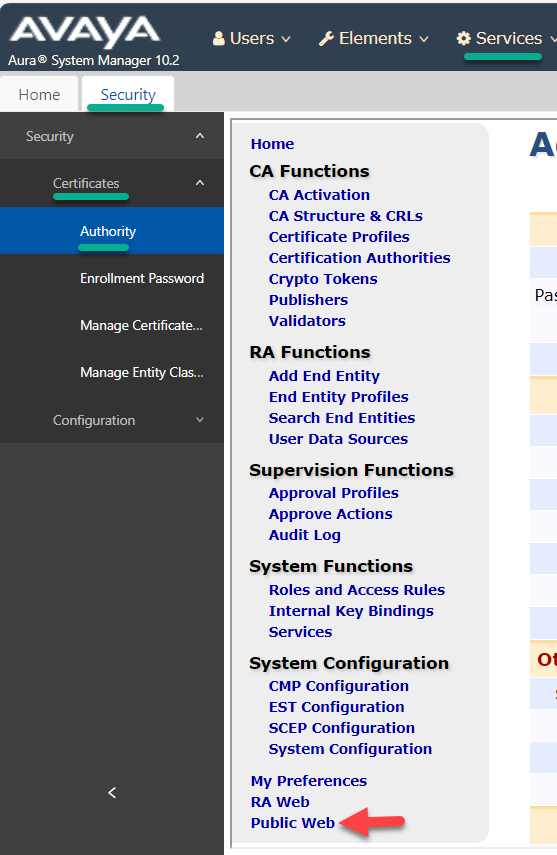
- From the middle column menu, under System Configuration, select Public Web.
ADDITIONAL INFORMATION:A new tab opens.
- From the EJBCA webpage, select Create Certificate from CSR under Enroll.
- Enter the following information:
- Username: The one configured when creating the entity during step 5 e.g. avaya
- Enrollment Code: The one configured when creating the entity during step 5 i.e. avaya123
- Request file: Select Choose File to import the CSR file created during Generating the certificate signing request in KVM on RHEL 9.6 e.g. asp130-r660xs-RHEL96.acp.avaya.com.csr
- Result type: From drop-down menu, select PEM-full certificate chain.
ADDITIONAL INFORMATION:Full certificate chain is required for validation.
- Select OK to generate the certificate.
- A certificate with a PEM format is created and automatically downloaded to the computer used to issue the sign request.
ADDITIONAL INFORMATION:
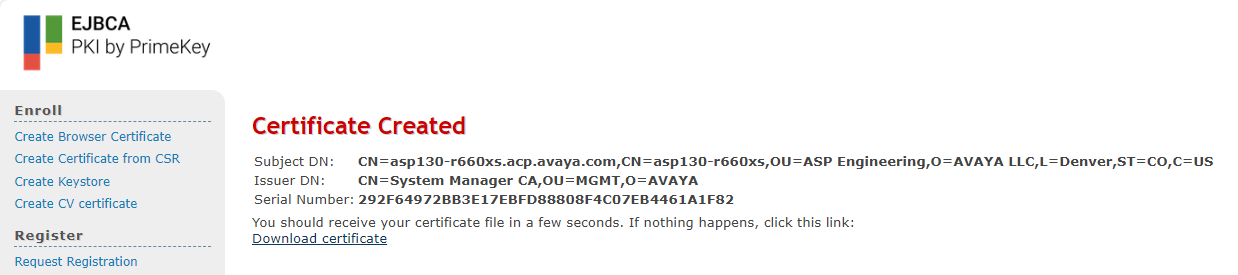
- Navigate to the location where the certificate is downloaded.
- Rename and change the extension to .cert of the PEM certificate generated by Avaya Aura® System Manager to match exactly the KVM on RHEL 9.6 host e.g. asp130-r660xs.acp.avaya.com.cert.
ADDITIONAL INFORMATION:Note:Changing the file extension from .pem to .cert (or vice versa) does not alter the actual content of the file because both file formats essentially contain the same type of data: encoded X.509 certificates.
