

AVAYA DOCUMENTATION CENTER
Find answers to your technical questions and learn how to use our products
IP Office Voicemail Pro Example Exercises
Adding a Voice Question Action
You can add an option to leave a message in response to pre-recorded prompts. The Voice Question action is used to create an interview process. In this example, as a caller, you can provide the information about where you want a catalog to be sent. Several recordings are made and played in sequence.
The following is an image of a completed call flow:
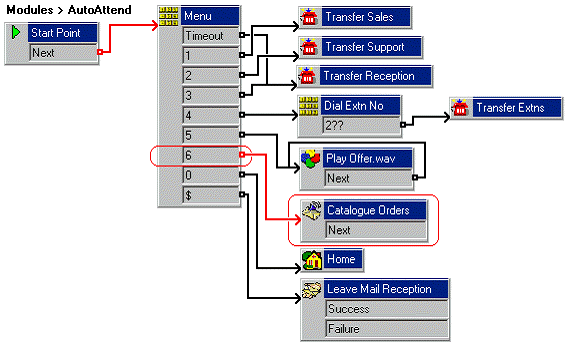
The red arrow or arrows in the call flow are the changes added in this section.
- Do the following to add a new option to the Menu:
- Select the AutoAttend module.
- Open Properties for the
 Menu action.
 - In the Touch Tones tab, select 6.
- Click OK.
- Do the following to add a new Voice Question action:
- Click the
 Mailbox Actions icon and select
  Voice Question.
 - Click the Details pane to place the action.
- Open Properties for the new Voice Question action.
- In the General tab, change the Token Name to Catalog Orders.
- Click the
- Do the following to record a message:
- In the Specific tab, click
 Add a Prompt icon. The Wave Editor window appears.
 - Click the Use which media device? arrow and select Telephony Handset.
- In Extensions, type the extension number which you want to record.
- In Please select a file or enter a new file name, type catalogue.wav.
- Select
 Record. The telephone corresponding to the extension number entered rings, and you can start to record the prompt.
 - Click
 Stop when you finish the recording.
 - Click
 Play to reply to the recorded message.
 - Record a message to inform the caller. For example: "Please follow the instructions to record your name and address and our catalog will be sent to you".
- To re-record the message, select Record.
- When recording is complete, replace the telephone handset.
- Click Close.
- In the Specific tab, click
- Do the following to add the full name and company name:
- Click the
 Add icon and record name.wav. Record a message asking for full name and company name. For example: "Please say your full name and company. Press # to continue".
 - Click Close.
- Click the
 Record Response icon, enter 10.
 - Click OK.
- Click the
- Do the following to add the delivery address:
- Click the Add icon and record address.wav. Record a message asking for a delivery address. For example: Please say your full address. Press # to continue.
- Click Close.
- Click the Record Response icon, enter 10 and select OK.
- Click the
- Do the following to add a thank message:
- Click the Add icon, and record thanks.wav. Record a message thanking the caller. For example: Thank you, your catalog will be sent to the address given.
- Click Close.
- Click the
- In the Properties for Catalog Orders window, do the following:
- Select that the sequence of files to be played and recordings are available.
ADDITIONAL INFORMATION:
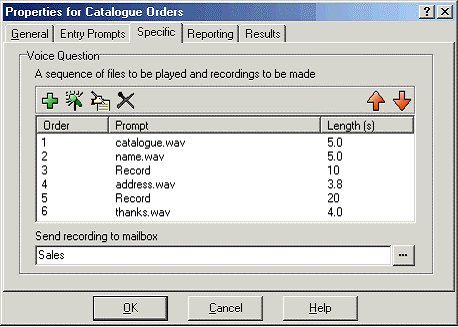
- In Send Recording to Mailbox, enter Sales. Any messages left are stored in the voicemail box for the Sales group.
- Click OK.
- Select that the sequence of files to be played and recordings are available.
- Do the following to add connections:
- Click
 Connection.
 - Set 6 to the Catalog Orders action.
- Click
- Select Close and OK.
- Click the
 Save & Make Live icon.
 - The auto-attendant greeting needs to be re-recorded to include the new options. For example: "Welcome to Avaya. Please press 1 for Sales, 2 for Support, 3 for Reception, 4 to dial the extension you want, or 5 to hear the latest sales offer. If you require a catalog press 6. Alternatively hold for further assistance or press 0 to listen to the options again. Thank you." This can be done using the callflow and short code (*80) created earlier.
- Do the following to test the new options:
- To make a test call to the auto-attendant, dial *90. You should hear the announcement.
- Dial 6 to access the Voice Question. Record your name and address when prompted.