

AVAYA DOCUMENTATION CENTER
Find answers to your technical questions and learn how to use our products
IP Office Voicemail Pro Example Exercises
Adding the Assisted Transfer Action
The following is an image of a completed call flow:
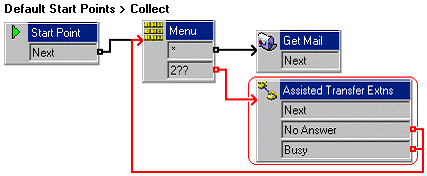
The red arrow or arrows in the call flow are the changes added in this section.
- Within , delete the Transfer Extn action.
- From Telephony Actions, add an Assisted Transfer action and open its properties.
- Change Token Name to Assisted Transfer Extns.
- In the Specific tab, in Mailbox, enter $KEY.
- Change No Answer Timeout to 10 seconds, and select OK.
- Do the following to add a connection:
- Click
 Connection.
 - Click 2?? for the call flow to the Assisted Transfer Extns action.
- Click No Answer or Busy for the call flow to the Menu.
- Click
- Click the
 Save & Make Live icon.
 - Do the following to test call flow:
- Make 208 busy. At another extension, dial *17. Dial 208 when prompted.
- As 208 is busy, you are returned to the Menu action.
- Dial another extension that you know is free. Allow this extension to ring for 10 seconds, and you are returned to the Menu action again.