

AVAYA DOCUMENTATION CENTER
Find answers to your technical questions and learn how to use our products
Deploying Avaya Wireless DECT with IP Office
Enabling Provisioning
You can now configure the master base station for IP Office provisioning. Once you have enabled provisioning, several fields of the base station configuration will be set by the IP Office system. Other fields are greyed out and or automatically set to the values required for IP Office operation.
Before enabling IP Office provisioning, ensure that you configure the time zone. Otherwise, the time and date on all sets will be incorrect, as the IP Office is automatically set as the time server.
- Select Services and then select the Provisioning tab. This tab is only available when the base station's Master setting is Active and the PBX setting is set to IPO (see Select Master Mode).
ADDITIONAL INFORMATION:
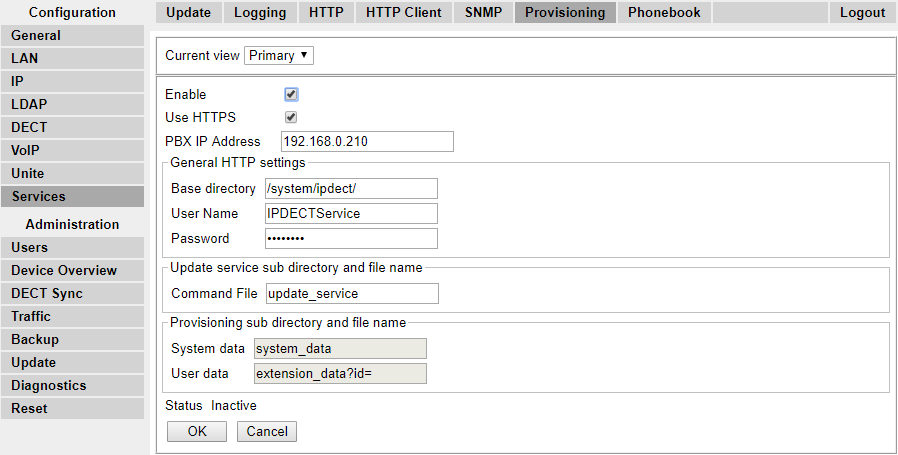
- Select the Enable option.
- The IP Office security settings control whether HTTPS is supported between the IP Office control unit and the master base station (by default it is supported). To configure the IP DECT to use both self-signed certificates and approved certificates from a trusted location, enable the Use HTTPS checkbox and refer to Security Settings.
- Set the PBX IP Address to match the IP Office system on which the IP DECT line was configured.
- In the User Name and Password fields, set the details to match the IP Office system’s service user configured for IP DECT. See Security Settings.
- Click OK.
- Reset the base station.
- Select the Services | Provisioning tab again. The Status should have changed to Connected. If not, a user name/password mismatch may have caused the IP Office service user account to become disabled, check the settings and re-enable the user.
- Select DECT | SARI. The value of the SARI entered into the IP Office configuration should now also be visible in the base station configuration.
- Select DECT | System.