Configuring a backup task

Last Updated : Apr 21, 2021 |

About this task

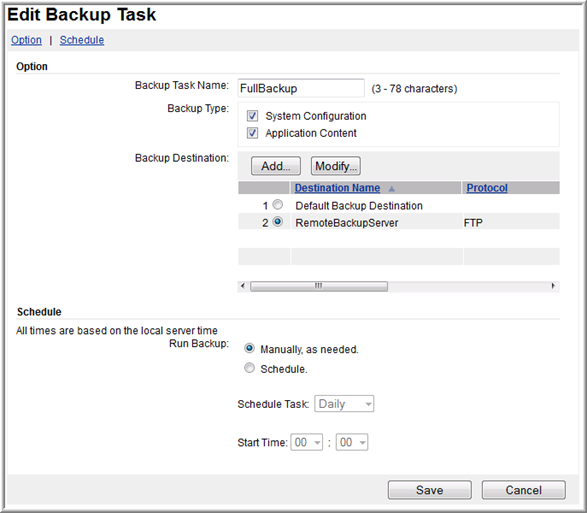
EM organizes backups as tasks. These tasks contain your selected backup options and specify the location where the backup is stored.

You can create an automated backup task to create backups daily, weekly, monthly or at one particular time. You can store the backup in a local destination directory. Alternatively, you can push the backup file to a remote server by using File Transfer Protocol (FTP) or SFTP (Secure File Transfer Protocol).

You cannot change the predefined local Default Backup Destination. If the administrator chooses to create a backup using this destination, EM stores the backup files in the following predefined local directory on Avaya Aura® MS.

$MASHOME/platdata/EAM/Backups

You can configure remote backup destinations and these destinations can be shared by multiple backup tasks. When you perform backups to remote destinations, EM uploads the backup files to the specified FTP or SFTP server. If required, EM deletes the local backup file from Avaya Aura® MS after the file transfer completes.

There are two types of content that you can include in the backups: System Configuration and Application Content. You can create one task for both the backup types or create separate tasks, each with independent schedules. Each backup type contains the following information:

Type of content

Description

System Configuration

Contains all the Avaya Aura® MS system settings that the Avaya Aura® MS management system has configured. For example, the settings you configure with the EM.

Application Content

Includes data that the Avaya Aura® MS Content Store manages. The data can either be the data that the applications generate or subscribers save. Examples of these data include, application prompts, subscriber preferences for a conferencing service or deposited recordings and user preferences for a service. The backup type does not include files stored on Avaya Aura® MS which are not stored in Content Store.

Perform the following procedure to define or update backup tasks and destinations using EM:

Procedure

  1. Navigate to EM > Tools > Backup and Restore > Backup Tasks.
  2. To create a new backup task either click Add or select an existing task from the list and click Edit.


  3. Enter a name without spaces for this backup task in the Backup Task Name field.
  4. For a complete backup, select both System Configuration and Application Content backup types.
  5. Configure the destination for your backup files by selecting one of the following options:
    • Select the Default Backup Destination to store the backup on the local disk.

      This option does not protect your system from Avaya Aura® MS disk drive failure.

    • Select Add... to define a new remote FTP or SFTP location for your backup file.

    • Select an existing destination and click Modify... to alter the remote FTP or SFTP properties.

    For SFTP configuration, the Secure FTP Remote Server Fingerprint field can be set in MD5 or Base64 format.

    Both the formats are supported by PuTTY tool which is used to perform the SFTP.

    • MD5 based key fingerprint based on PuTTY’s display form (sixteen 2-digit hex numbers separated by a colon)

    • Base64 encoded blob describing SSH-2 public key in OpenSSH’s public key format

    Base64 can be obtained using the following command (note than you need to replace IP with hostname or IP of your backup server).

    cust@someserver ~]$ ssh-keyscan 192.168.127.53 2>/dev/null
    # 192.168.127.53:22 SSH-2.0-OpenSSH_7.4
    192.168.127.53 ssh-rsa 
    AAAAB3NzaC1yc2EAAAADAQABAAABAQCrC1oA7jRu1qQ/9FFkEI0VIdeSJq9QRH1dsLwm1Veo0sEULHBUJYTT8TGU5B/
    mnk4Zmkav8O6H9IZi7hDuexq0PHFTuNjUKHnvlmVirt/4W+rWmSIgLwLXJonQA9tlYqC28CfDFOLIp+ajUTWa1Lu2PoZvthGdiAgJKpBLqnXE9F+
    PY3jkZkrxdOzV+VC7S8p0wa3YPfj1/I4CnFvBbZDRCz3587GQFv8CeCkTKPkaNk9MoNCrqDxdhxcg+wlaKPW21gyThdXrn6bILzaEaM/
    C9q2NZ6+rSkqY0TvNHQ3wLZTZkxg0btX+kR9grv+en/TJq6/s9Y/YeW3YIHebVxsX
    # 192.168.127.53:22 SSH-2.0-OpenSSH_7.4
    192.168.127.53 ecdsa-sha2-nistp256 AAAAE2VjZHNhLXNoYTItbmlzdHAyNTYAAAAIbmlzdHAyNTYAAABBBCzzPykTVYjYmdQjYM1JTPmq1hdGpToHlAk1lTgB4QGxxykEbVZdUgP2lXdWooKgz1qmZ7jnuGD+QyMSJN/+aVU=
    # 192.168.127.53:22 SSH-2.0-OpenSSH_7.4
    192.168.127.53 ssh-ed25519 AAAAC3NzaC1lZDI1NTE5AAAAIA1kZVjNDMvODdKITolT5KUbA3hJlgc6X9BiLHRDWZbL
    

    The MD5 can be obtained using the following command.

    [cust@someserver ~]$ ssh-keygen -l -E md5 -f <(ssh-keyscan 
    192.168.127.53 2>/dev/null)
    2048 MD5:9a:71:b9:79:10:27:b1:a3:cb:66:c6:98:13:67:14:3f 192.168.127.53 (RSA)
    256 MD5:5b:04:06:fa:07:60:9d:b9:d9:53:cc:11:95:2a:2a:5e 192.168.127.53 (ECDSA)
    256 MD5:e0:4d:31:a4:22:71:d8:9b:17:34:87:40:d3:fc:5f:15 192.168.127.53 (ED25519)
    

    When FIPS is enabled on Avaya Aura® MS, MD5 hash cannot be calculated. However, Base64 can be retrieved and used always.

    Crypto algorithm needs to be selected according to the following PuTTY priority list: ED25519, ECDSA, RSA, DSA. In the above example, we use ED25519 and value marked as bold for the fingerprint field.

    For example, if backup server is configured to use only DSA and RSA, use RSA as it has higher priority for PuTTY.

  6. If you choose to add or modify a backup destination, then fill in the Backup Destination Properties:
    1. Enter the server properties in the fields.
    2. Check that path exists on the backup server and has write permissions for user specified in the properties.
    3. If you select FTP, click Test to verify whether your configuration can contact the server.
    4. Click Save.
  7. Select either Manually, as needed, or Schedule depending on how you want the backup to run.
  8. If you selected Schedule, then configure the Schedule Task either as Daily, Weekly, Monthly, or Once, and the date and time.
  9. Click Save.

    The new backup task is included in the list of Backup Tasks.