AVAYA DOCUMENTATION CENTER
Find answers to your technical questions and learn how to use our products
Implementing and Administering Avaya Aura® Media Server
EM interface
The following figure illustrates the features of the Element Manager (EM) interface:
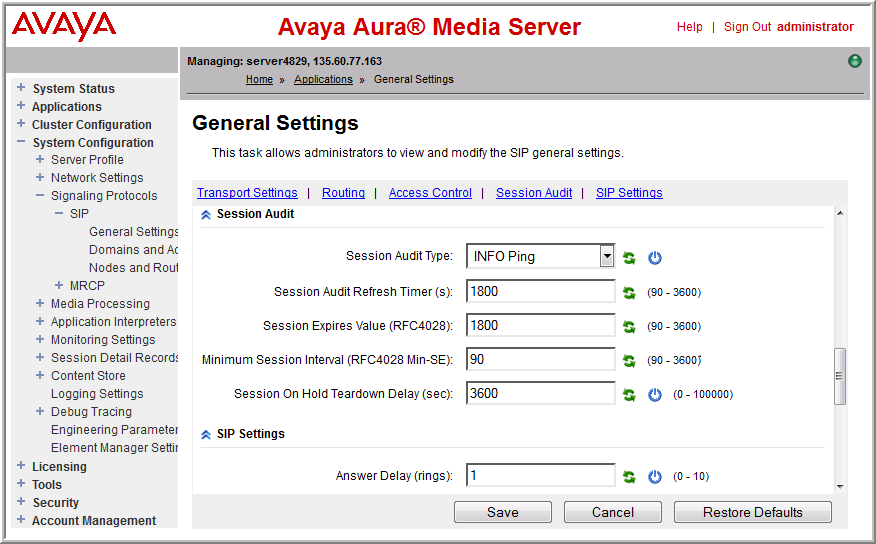
Task navigation
You can expand categories or higher-level tasks to reveal subtasks in the menu pane. Click the expansion button that appears to the left of the category or task label. If an item contains more contents, the system displays a plus sign (+) before the item. You can click the plus sign (+) to expand the item and display its contents.
Click the minus sign (-) to collapse the expanded contents.
Click an item label in the menu pane to select and launch the associated task in the content area.
Content areas with a large amount of content are divided into sections. Using the shortcut links provided at the top of the pane, you can navigate directly to the section of your interest. These links serve as an index of the content.
You can open a task in a new browser window or browser tab by using the right-click menu of the Web browser.
Scroll bars
The system displays vertical scroll bars when the system cannot display the content in a window without vertical clipping. The system displays horizontal scroll bars when the system cannot display the content in a window without horizontal clipping. You can reduce horizontal clipping by using the vertical line separating the menu pane and the content areas to resize the menu pane horizontally.
Disabled items
Some configuration items are designed to enable or disable certain other features on the page. You cannot modify configuration items which are unavailable, until you enable the configuration items by selecting other features.
Saving configuration changes
Click Save in the bottom-right corner of the configuration page to save changes. No changes are made to the system configuration until you click Save. The system validates the input it stores the configuration in the Avaya Aura® MS database. If the system detects any errors during the validation, the system redisplays the page with an error message for each invalid entry. Correct the errors and click Save to save the changes. After you save the changes, the system redisplays the parent of the current page, which is often the previous page.
If you do not want to save the changes made to the configuration, click Cancel to discard changes. If you click Cancel, the system returns to the parent of the current page without saving changes to the configuration.
Undo changes
You can use the restore default icon button ( ), next to the fields, to restore individual configuration items to the default value that Avaya provides. You can use the Restore Defaults button to restore all the fields on the current page to the default values. The Restore Defaults button is located next to the Save and Cancel buttons. Click Save to apply the restored default values to the system.
Avaya Aura® MS restarts
The system designates some configuration items with a restart icon ( ).
).
These configuration items require an Avaya Aura® MS restart for any change to take effect. For these items, saving the change only saves the change in the system database. Restart Avaya Aura® MS so that the change is applied to system processing.
Data validation
Configuration items with data entry fields also include the valid data range in parentheses at the right of the data field. For example, you can see a data range such as (90-3600) or a limit such as (maximum: 128 characters). Sometimes, the parentheses contain a description like (Service IP address). In these cases, the system verifies whether the data is in the IP address format.
Help
In addition to the main help document available using the Help link in the upper-right corner next to the Sign Out link, the system also dynamically displays help text when you hover your mouse cursor over certain elements of the display. If available, the system displays the help text near the cursor.
Task Removal from EM
Starting with Avaya Aura® MS 10.2, the following EM tasks are no longer needed and removed from EM:
Applications and all its subtasks.
.
.
and all its sub tasks.
.
Audio Codecs
Video Codecs
Digit Relay (DTMF)
Media Security
and all its sub tasks.
.
.