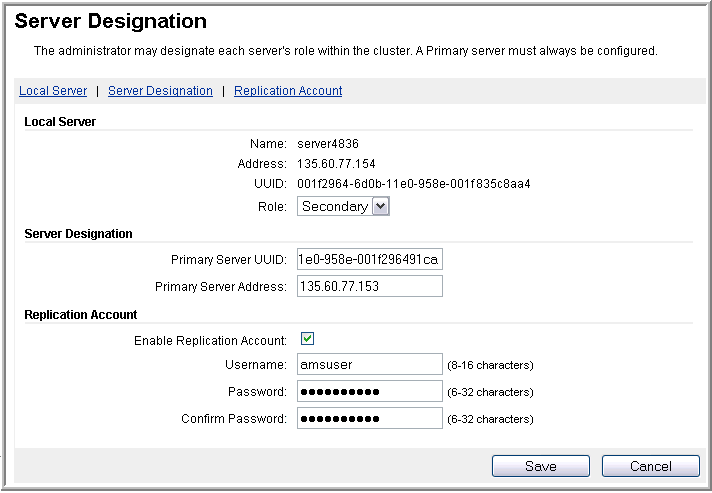
Configuring a Secondary server for a cluster

Last Updated : Dec 02, 2024 |

About this task

Using EM, perform the following procedure to configure Avaya Aura® MS as the Secondary server in an N+1 Load Sharing cluster:

Before you begin

  • Ensure to replace the default staging certificates. See Replacing Default Staging certificates for the procedure.

  • Configure a separate Avaya Aura® MS as the Primary server with a Replication Account enabled.

  • Obtain the UUID and the IP address of the Primary server.

  • Obtain the user name and the password of the Replication Account of the Primary server.

Procedure

  1. To designate a server as Secondary, navigate to EM > Cluster Configuration > Server Designation.


  2. In the Local Server section, set Role to Secondary.

    The system updates the page with fields that are specific to the Secondary server configuration.

  3. Using the EM for the Primary server, copy the UUID of the Primary server.

    For more information about copying the UUID, see Obtaining the UUID of a media server.

  4. Using the EM for the Secondary server, paste the UUID of the Primary server in the Primary Server UUID field.
    1. In the Primary Server Address field, enter the IP address of the Primary server.

    2. In the Replication Account section, ensure Enable Replication Account is selected.

    3. In the Username, Password, and Confirm Password fields, enter the user name and password for the Replication Account on the Primary server.

      Important:

      All servers in the cluster must use the same Replication Account user name and password.

  5. Click Save.
  6. Click Confirm.
  7. Restart Avaya Aura® MS for the changes to take effect. Navigate to EM > System Status > Element Status and click Restart.
  8. Click Confirm.

Next Steps

If you add a media server to a cluster enrolled in System Manager, then you must also enroll the new media server cluster node in System Manager.