AVAYA DOCUMENTATION CENTER
Find answers to your technical questions and learn how to use our products
DITA and Tridion Docs Work Instructions and Guidelines
Embedding text in an object
Inkscape treats text as an object and thus, a text object has attributes that can be set in Inkscape. Therefore, you can extract and replace the text object appropriately during translation.
Important:
Leave sufficient space in your objects for text expansion during translation. You must leave space for at least 20% text expansion, even if the illustration isn’t initially going to be translated.
Before you begin
Create the object in which you want to embed the text. For example, create a rectangle with the necessary properties into which you will write the text.
- Click on the text tool
 .
. - Position cursor where you need the text to be and start typing.
ADDITIONAL INFORMATION:Important:Do not drag the text tool to create a text box. This creates what’s called
flowed text
, and this is not fully supported in SVG. If you do this, the text will not appear in the graphic in your output. Instead just position the cursor and start typing as stated in the step. - Allow enough space for expansion during translation:
- Copy the text you entered and paste it into the shape (typically text won’t expand more than double during translation).
- Increase the size of the object if necessary.
- Remove the second instance of the text.
- To set the text style and size:
- Select .
- On the Text and Font dialog, set the Font family to Arial, the Style to Normal, and the Font size to 14.
ADDITIONAL INFORMATION:Note:Arial 14 is the required size because it is the minimum size necessary for Asian characters to be readable in translated images. The way Inkscape renders text, a font size 14 actually looks like Arial 11 in other tools. When you set Arial as the font style and set the size to at least 14, select Set as Default on the Text and Font panel.
- Click Apply and then Close.
ADDITIONAL INFORMATION: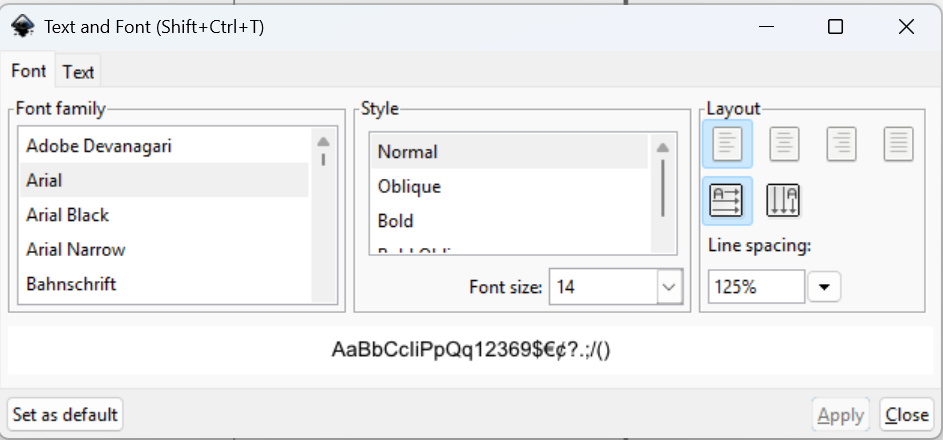
- To change the color of the text, select to open the Fill and Stroke panel, change the settings, and click Apply and then Close.
- To center the text in the object, do the following:
ADDITIONAL INFORMATION:
- Select the text object.
- Press the Shift key and select the object in which you want to align the text.
- Select .
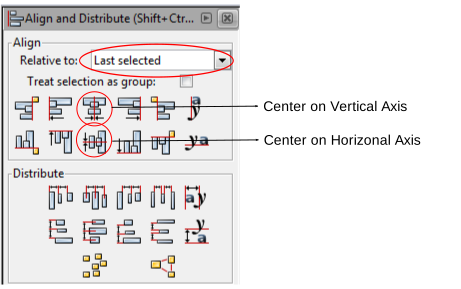
- In the Align and Distribute menu, under Align, select Last Selected in the Relative to field.
- Click Center on Vertical axis (icon is third from the left in the first row)
- Click Center on Horizontal axis (icon is third from the left in the second row).
The figure shows the Align and Distribute menu values for centering the text: