

AVAYA DOCUMENTATION CENTER
Find answers to your technical questions and learn how to use our products
Deploying Avaya Workspaces for Call Center Elite
Adding AUX codes
In a Call Center Elite solution, agents can enter Auxiliary Work (AUX) mode using different reason codes. Agents set these AUX codes using their phones.
In Avaya Workspaces, codes used before and after handling contacts are called user codes. For example, enter a user code while changing state, or before going on a break, an agent can use a user code configured to represent break time.
If an agent sets an AUX code using their phone, this is reflected on Avaya Workspaces. If an agent uses Avaya Workspaces to set a user code, this code is also set on Call Center Elite and can be reported on by Call Management System (CMS). In an Avaya Workspaces for Call Center Elite solution, agent states and reason codes are always synchronized between agent phones and Avaya Workspaces.
Use this procedure to add AUX codes on Communication Manager. Call Center Elite supports single digit or two digit AUX codes.
Important:
You must also configure AUX codes in Avaya Control Manager to ensure the AUX codes are synchronized to UCA. If no AUX codes exist in UCA, agents cannot go Not Ready in Avaya Workspaces. For more information about configuring AUX codes in Avaya Control Manager, see Configuring AUX codes.
- Using an SSH client, connect to the Communication Manager System Access Terminal (SAT) interface.
- If you want to add AUX codes with two digits, perform the following steps:
- Use the change system-parameters features command, and ensure that the Two-Digit Aux Work Reason Codes? field is set to y:

- Save the settings.
- Use the change cti-link command, and ensure that the Two-Digit Aux Work Reason Codes? field is set to y:
ADDITIONAL INFORMATION:Important:You must busy out the cti-link before changing this field. Ensure that you release the cti-link after you save your changes.
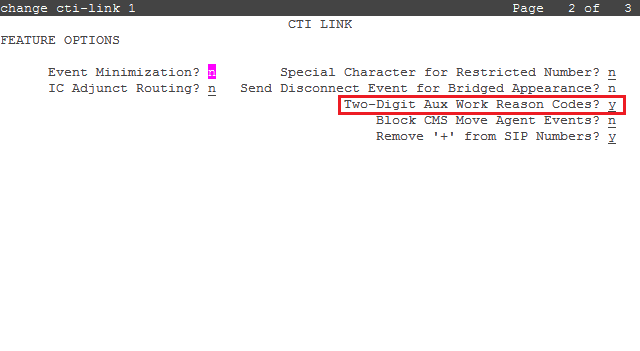
- Save the settings.
- Use the change system-parameters features command, and ensure that the Two-Digit Aux Work Reason Codes? field is set to y:
- To add AUX codes, use the change reason-code-names command.
- On page 1 of the REASON CODE NAMES screen, enter names for the AUX codes as required.
- Save the settings.
