Creating and scheduling a timetable

최근 업데이트 : May 13, 2015 |

About this task

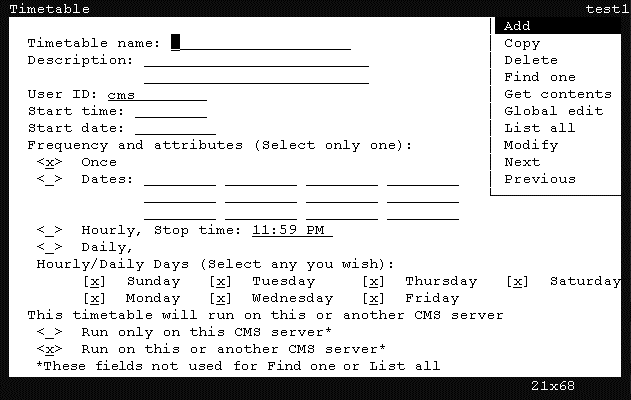
This topic provides the procedure for creating and scheduling a timetable through the CMS ASCII interface.

Procedure

  1. From the CMS Main Menu, select the Keep Screen-Labeled Key (SLK), using one of the following methods, depending on the connection method:
    • For Terminal Emulator, select the F4 key.

    • From the CMS console, press the F4 key.

    • For a telnet session from a PC, press Ctrl+P+4.

  2. Select Timetable name and press the Enter key.

    CMS displays the Timetable window.


  3. In the Timetable name field, enter a unique name for this timetable. The name of the timetable cannot be changed after it has been created. Every timetable must have a unique name.

    The following list provides the types of characters that can be entered in this field:

    • Alphanumeric (A-z, 0-9)

    • Underscore (_)

    • Blank ( )

    • Comma (,)

    • Period (.)

    • Single Quotation Marks (')

    • Plus sign (+)

  4. In the Description field, enter a description for the timetable.

    This field is optional.

  5. In the User ID field, the user ID currently logged in is displayed. If you are an administrator and want to create this timetable for another user ID, enter that user ID in this field.
  6. In the Start Time field, enter the time when the timetable will be executed. If you do not wish to schedule the timetable at this time, leave this field blank.

    This field can accept time in the following formats:

    • HH AM/PM

    • HH:MM AM/PM

    • 24-hour (00:00 - 23:59)

    If AM/PM is not specified, CMS assumes that the time entered is in the 24-hour format.

  7. In the Start Date field, enter the date on which the timetable will begin running.

    Use one of the following formats for entering the date in this field:

    • MM/DD/YY - For example, 12/12/01. Do not enter four-digits years in this field.

    • Relative format - For example, entering a 1 specifies the timetable will begin one day from today (tomorrow).

      Important:

      If you do not wish to schedule the time table at this point, leave the Start Time and Start Date fields blank, ensure an x is in the Once field, and skip ahead to Step 11.

  8. In the Frequency and attributes group, choose from the following options:
    • Once - This option runs the timetable one time for the date and time specified in the Start Date and Start Time fields. This is the default value for this field group.

    • Dates - This option runs the timetable on specific dates. Enter the dates in the fields provided for this option.

    • Hourly - This option runs the timetable each hour. In the Stop Time field, enter the time when the timetable should stop running.

    • Daily - This option runs the timetable on the selected days in the Hourly/Daily Days group.

  9. If the Hourly or Daily option was selected in the previous step, place an x next to the days in the Hourly/Daily Days group for which the timetable should run.
  10. Place an x in one of the following options:
    • RunonlyonthisCMSserver - The timetable will run only on this CMS server. If this timetable is backed up and migrated to another CMS server, it will not run.

    • Run on this or another CMS server - The timetable is capable of running on this or any other CMS server. If this timetable is backed up and migrated to another CMS server, it will function normally.

  11. Press the Enter key, highlight the Add item on the action list by using the arrow keys on the keyboard, and press Enter again.

    The window displays a Working message. If the timetable name is currently present, Already exists displays on the status line and you must enter a different timetable name in the Timetable name field. If all entries are valid, the Main Menu displays with Keeping Entries displayed in the border.

  12. Select a task from the CMS Main Menu that will be recorded to this new timetable.

    CMS displays an Entries Stored in the status line of the current window when the task is run.

  13. To run an historical report for the system:
    1. Select Reports from the Main Menu.
    2. Select Historical.
    3. Select System.
    4. Select System.
    5. Select Daily.

      CMS displays the report window.

  14. Enter the required information in the Split(s)/Skill(s) and Date fields.

    TheDate field can accept relative dates; for example, 0 represents today and -1 represents yesterday.

  15. Press the Enter key to access the action list, select the menu item that performs the necessary action, and then press the Enter key again.

    CMS displays a confirmation window.

It is possible to create more than one timetable task from a window. For example, suppose you want historical split/skill summary interval reports for skills 1 through 9, and you also want the same date and times for each report.

  1. To create this report, perform the following steps:
    1. Go to the report window and enter 1 for the skill number, 0 for the date, and 8:00-16:00 for the times.
    2. Select Run on the action list. This creates a timetable task for skill 1.
    3. Returning to the report input window, enter 2 for the skill number and select Run on the action list. This creates a timetable task for skill 2. Repeat the same process for skills 3 through 9.
  2. Exit the window for the task and return to the Main Menu.
  3. To add more tasks to the timetable, return to Step 12. Otherwise, open the Keep SLK menu and then select the Stop option.

    CMS displays a confirmation window asking if the timetable should be saved.

  4. When CMS displays the confirmation window, press the Y key and then the Enter key to save the task.
    Note:

    To exit the timetable at any time without saving your changes, select Stop from the Keep SLK menu and then enter n in the confirmation window.

  5. Select the Exit SLK to close the Timetable window.