

AVAYA DOCUMENTATION CENTER
Find answers to your technical questions and learn how to use our products
Avaya Aura Presence Services Snap-in Reference
Creating a reverse proxy service for Avaya Workplace Client multimedia messaging
The purpose of this task is to provide a reverse proxy for remote worker clients to be able to connect to the various nodes of the cluster. Use the following procedure for each Avaya SBCE.
Note:
Each Breeze Asset FQDN must also be added to the external DNS and resolve to the external IP defined.
- Log on to Element Management System (EMS) web interface.
- Navigate to .
ADDITIONAL INFORMATION:The EMS server displays the Relay Services page.
- In the Reverse Proxy tab, click Add.
- On the Add Reverse Proxy Profile page, do the following:
- In the Service Name field, type the reverse proxy profile name.
- Select the Enabled check box.
- In the Listen IP field, click the external SBC IP address.
- In the Listen Protocol field, select the HTTPS protocol.
ADDITIONAL INFORMATION:The system enables the Listen TLS profile field.
- In the Listen TLS Profile field, click the server TLS profile that you created.
ADDITIONAL INFORMATION:For more information, see
Creating a new TLS server profile
in the Administering Avaya Session Border Controller for Enterprise guide.The CN or SAN of the certificate must contain the hostname of the Avaya Breeze® platform Security Module that is configured in this procedure and should be signed by same signatory that signs the Avaya Breeze® platform identity certificates. - In the Listen Port field, type the port for remote users.
- In the Server Protocol field, click HTTPS.
- In the Server TLS Profile field, click the client TLS profile that you created.
ADDITIONAL INFORMATION:For more information, see
Creating a client profile
in the Administering Avaya Session Border Controller for Enterprise guide.The certificate must be signed by a signatory that is trusted by the Avaya Breeze® platform that is configured in this procedure. - In the Connect IP field, click the IP address that Avaya SBCE must use for communicating with the file servers.
- In the PPM Mapping Profile field, click None.
- In the Server Addresses field, type the Avaya Breeze® platform Security Module IP address of the Presence Services node.
- Click Finish.
- Repeat step 4 for each Avaya Breeze® platform node in the Presence Services cluster.
- If the Presence Services cluster is a multinode cluster, you must configure a proxy for the load balancer IP address. You can either use an existing profile or add a new profile.
- To use an existing proxy profile, do the following:
- On the Reverse Proxy tab, click Edit corresponding to the proxy profile that you have created for the Avaya Breeze® platform Presence Services node.
- In the Edit Profile <profile name> dialog box, in the Whitelisted URL field, type the whitelisted URL of /services/PresenceServices/rest/aem/.
ADDITIONAL INFORMATION:Use the Whitelisted URL field corresponding to the Server Addresses field that contains the Avaya Breeze® platform Security Module IP address of the Presence Services node.
- Click Add to add the server address of the cluster load balancer.
- In the Server Addresses field, type the IP address or FQDN of the cluster load balancer.
- In the corresponding Whitelisted URL field, type the whitelisted URL of /aem/resources.
- Click Finish.
ADDITIONAL INFORMATION:The following diagram illustrates an example of the settings for the nth Breeze node. In the example, one of the external IPs to relay both directly to the Breeze node and to the Breeze cluster load-balancer is selected, depending on the URL path.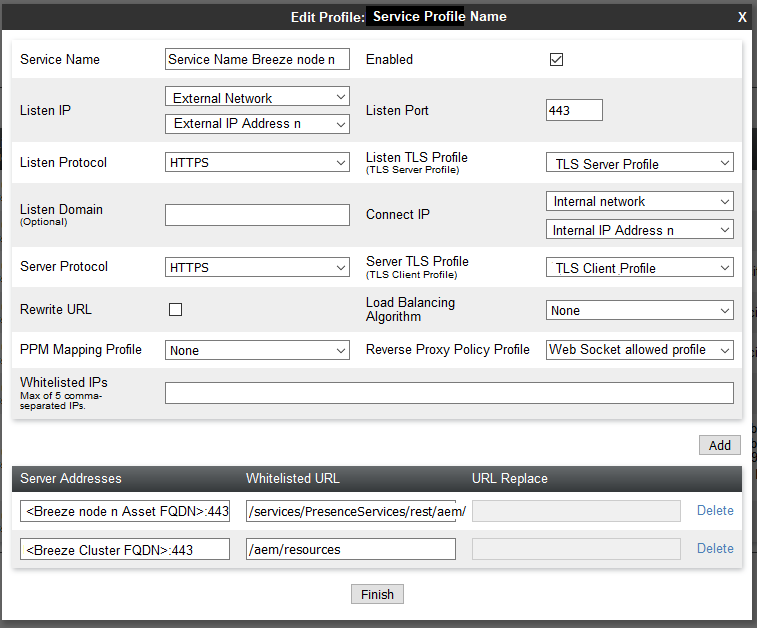
- To add a new profile, do the following:
- Repeat step 3 and 4.
ADDITIONAL INFORMATION:Note:In the Server Addresses field in step 4, type the cluster IP address or cluster FQDN of the Presence Services cluster.For more information about Presence Services cluster IP address and cluster FQDN, see
Administering the Avaya Breeze® platform cluster.
- Click Finish.
- Repeat step 3 and 4.
- Complete the following procedure: Specifying the IP addresses of the Session Border Controller or proxy servers for Presence Services cluster load balancing. Add the SBC internal network Connect IP address to the list of
Trusted Addresses for converting to use X-real-IP for session affinity
.
Result
Assuming a multi-node cluster of <n> servers, you must have something as follows:
|
Service Name
|
Listen IP:Port and Protocol Network
|
Connect IP Network
|
Server Protocol
|
Server Addresses and Ports
|
|---|---|---|---|---|
|
<Service name for Breeze node 1>
|
<external IP address 1>:443 HTTPS
External network side
|
<internal IP address 1>
Internal network side
|
HTTPS
|
<Breeze node 1 Asset FQDN>:443
|
|
<Service name for Breeze node 2>
|
<external IP address 2>:443 HTTPS
External network side
|
<internal IP address 2>
Internal network side
|
HTTPS
|
<Breeze node 2 Asset FQDN>:443
|
|
<Service name for Breeze node n>
|
<external IP address n>:443 HTTPS
External network side
|
<internal IP address n>
Internal network side
|
HTTPS
|
<Breeze node n Asset FQDN>:443, <Breeze Cluster FQDN>:443*
|
|
<Service name for load-balancer>
|
<external IP address n+1>:443 HTTPS
External network side
|
<internal IP address n+1>
Internal network side
|
HTTPS
|
<Breeze Cluster FQDN>:443**
|
|
FQDN
|
IP
|
|---|---|
|
Breeze node 1 Asset FQDN
|
External IP address 1
|
|
Breeze node 2 Asset FQDN
|
External IP address 2
|
|
Breeze node n Asset FQDN
|
External IP address n
|
|
Breeze Cluster Load-balancer
|
External IP address n* or Dedicated LB (external IP address n+1)**
|
|
FQDN
|
IP
|
|---|---|
|
Breeze node 1 Asset FQDN
|
Node 1 Breeze Asset IP
|
|
Breeze node 2 Asset FQDN
|
Node 2 Breeze Asset IP
|
|
Breeze node n Asset FQDN
|
Node 3 Breeze Asset IP
|
|
Breeze Cluster Load-balancer
|
Breeze Cluster IP
|
* Use one external IP to also relay to the Breeze Cluster load-balancer. Follow step 7 to add Whitelisted URLs, and do not perform step 8. Do not create a separate service entry for the load-balancer.
** Use a dedicated external IP to relay to the Breeze load-balancer. Follow step 8, and do not perform step 7. Do not add the Breeze Cluster FQDN to any of the Server Addresses of nodes 1 to n.