AVAYA DOCUMENTATION CENTER
Find answers to your technical questions and learn how to use our products
Administering Avaya Call Management System
Globally editing tasks in a timetable
About this task
This topic provides the procedure for changing multiple tasks in a timetable to use a common date, time, or printer destination. For example, you may want to run all reports within a timetable so that instead of reporting on data for today (relative date: 0), the reports will use data from yesterday (relative date: -1). Using the global edit feature can change the dates used for these reports in a simple series of steps instead of modifying each task separately. This feature can also be used to modify tasks that have different values for times, dates, or printer destinations so that all specified tasks use consistent values.
Before you begin
The following items should be read and understood before making global edits to timetable tasks:
Only the owner of the timetable or an administrator can globally edit a timetable.
If an error is made during a global edit, CMS displays an error message describing the nature of the problem. All errors must be corrected before CMS allows you to complete the modifications.
Procedure
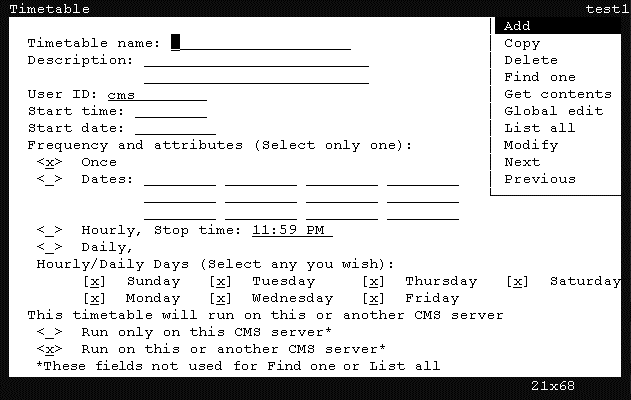
- Select Timetable and press the Enter key.
CMS displays the Timetable window.
- Using the arrow keys, highlight Get contents and press the Enter key.
CMS displays the Timetable: Get Contents window.
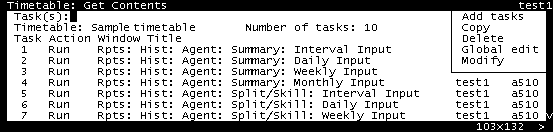
- Using the arrow keys, highlight Global edit and press the Enter key.
CMS displays the Timetable: Get contents: Global edit window.

- Using the arrow keys, highlight Confirm and press the Enter key.
CMS displays the Timetable: Get Contents: Global Edit: Confirm window.
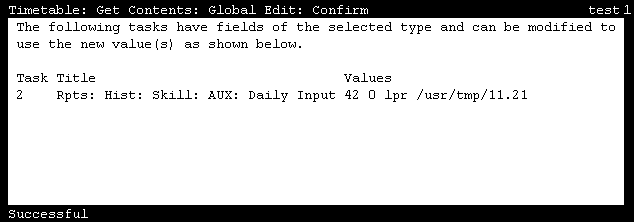
This window is used to confirm the tasks that will be modified. No changes have been made at this point. If some specified tasks do not appear in the confirmation window, it is because those tasks do not use the data specified when they are run. For example, some reports only use a date value to retrieve information; therefore, changing the time value will not modify this task. If the tasks listed in this window are not correct, you can go back to the previous windows and make adjustments as necessary.