AVAYA DOCUMENTATION CENTER
Find answers to your technical questions and learn how to use our products
Administering Avaya IP Office using Manager
Using the Network Viewer
Clicking on Small Community Network in the configuration tree displays the Network Viewer. This shows each of the systems in the Small Community Network and the links between each of the systems. Systems with attached Voicemail Pro servers are also indicated.
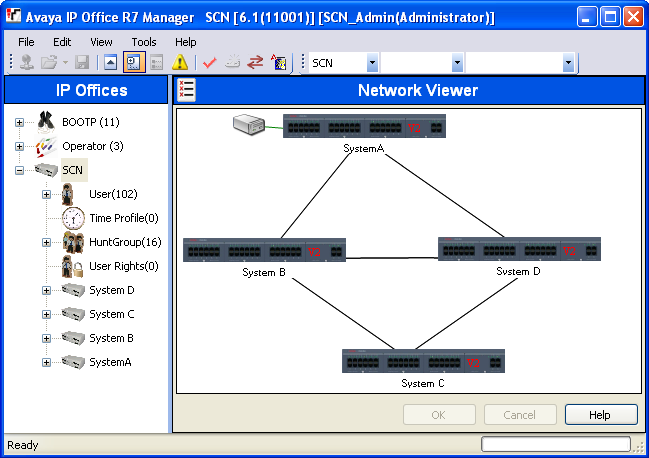
Green System with Voicemail Pro system.
Black Small Community Network line between two systems.
Red Incorrect Small Community Network line between systems (probably one-way connection). Right-click on the line and select Repair.
You can use the Network Viewer to perform a range of functions:
Arrange the View
Launch System Status
Launch Voicemail Pro
Add an IP Office Line
Add a system
Remove an IP Office Line
Remove a system from the Small Community Network
Repairing an IP Office Line
Add a Background Image
Arranging the View
About this task
Procedure
You can click and drag items around in order to position them where required.
Alternatively if you right click on the view you can select Auto Arrange.
Note:
The position of elements in the network view are stored as part of the system configuration. Therefore changes to the view will require the configuration to be saved.
Adding a Line Within the Small Community Network
About this task
You can use the network viewer to add a Small Community Network link between two systems in the Small Community Network that are currently linked. This process will add new H.323 Small Community Network line records to the configurations of each of the systems.
Note:
Adding a line between systems will require those systems to reboot when the changes are saved.
Procedure
Repairing a Line Within the Small Community Network
About this task
A red line in the network viewer indicates a incorrectly configured line between two systems in the Small Community Network. Typically this will be a line configured in one of the systems but not matched by a line configured in the other system. The network viewer can be used to correct this error.
Procedure
- Note that adding a line between systems will require those systems to reboot when the changes are saved.
- Right click on the red line and select Repair Line.
- The line is changed to black.
- Click OK.
Adding a System to the Small Community Network
About this task
You can use the network viewer to add a Small Community Network line to a system not yet in the Small Community Network. This process will add new H.323 Small Community Network line records to the configurations of each of the systems.
Procedure
Removing a Small Community Network Line
About this task
You can use the network viewer to remove the Small Community Network lines between two systems in the Small Community Network.
Procedure
- Note that removing a link between systems will require those systems to reboot when the changes are saved.
- Right click on the link and select Delete Line.
- The line is removed from the network viewer.
- Click OK.
Removing a System
About this task
You can use the network viewer to remove a system from the Small Community Network.
Procedure
- Note that removing a system will require previous linked systems to reboot when the changes are saved.
- Right click on the system and select Remove From Small Community Network.
- Any lines to other system in the Small Community Network are removed.
- Click OK.
Start System Status
About this task
If the System Status Application is also installed on the Manager PC, you can start it for a particular system.
Procedure
- Right click on the system and select System Status.
- The application is started and the login form pre filled with the IP address of the system.
Start Voicemail Pro
About this task
If the Voicemail Pro client is also installed on the Manager PC, you can start it for the any system with an associated Voicemail Pro server.
Procedure
Right click on the voicemail server icon and select Launch VMPro Client.
Add a Background Image
About this task
You can select an image file to be displayed in the background of the Network Viewer display. This file is not saved as part of the configuration in any way, ie. if the image file is moved or deleted it is not longer used by Manager.
Procedure
- Right click on the general background area of the network viewer and select Background Image.
- Select Set Background Image to browse to the location of the file to be used.
- The Visible option can be used to switch the display of the background image on or off.